This article contains more than 10 step-by-step master classes and ideas on how to make a Dragon figurine with your own hands, from the simplest ones that even children can handle to complex ones that require certain skills.
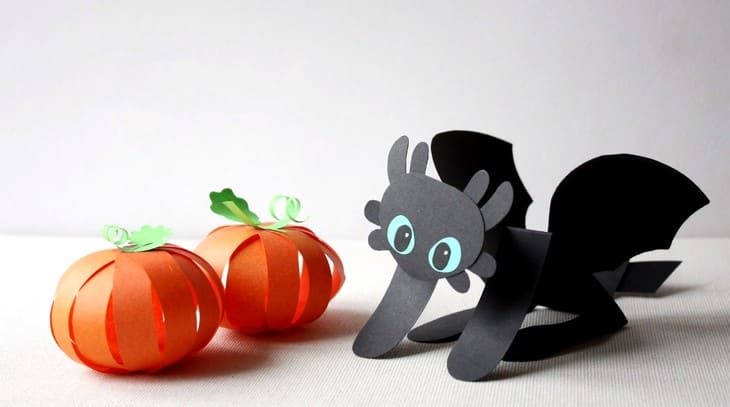
Cardboard dragon
If making a Dragon from wool requires special tools and devices, then even older children of kindergarten can make a Toothless from cardboard.
You will need:
- template of parts;
- black double-sided cardboard;
- green paper;
- ruler;
- scissors;
- pencil;
- glue stick.
How to do:
- Transfer and cut out the details onto black double-sided cardboard.
- Mark the fold lines on the large rectangle.
- Divide the side pieces into three parts and make cuts.
- On one side, fold the middle part like an accordion - this is the Dragon's neck.
- On the other side, cut out a triangle from the middle part – the tail.
- Round off the remaining four parts and bend them inward to create Toothless' paws.
- Cut out an oval shape for the dragon's head.
- Glue green eyes and black pupils onto it.
- Cut out and glue on the ears and three pairs of horns.
- Glue the head onto the neck.
- Cut out two wing blanks, place them on the body and glue them.
- All that's left is to cut out and glue small wings onto the tail and the cute Toothless Dragon is ready.
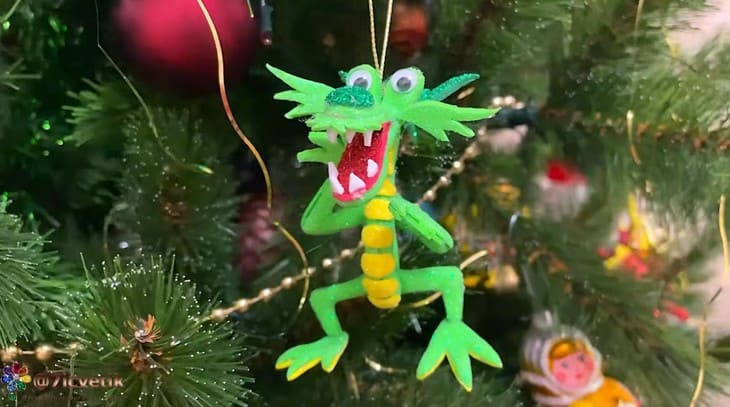
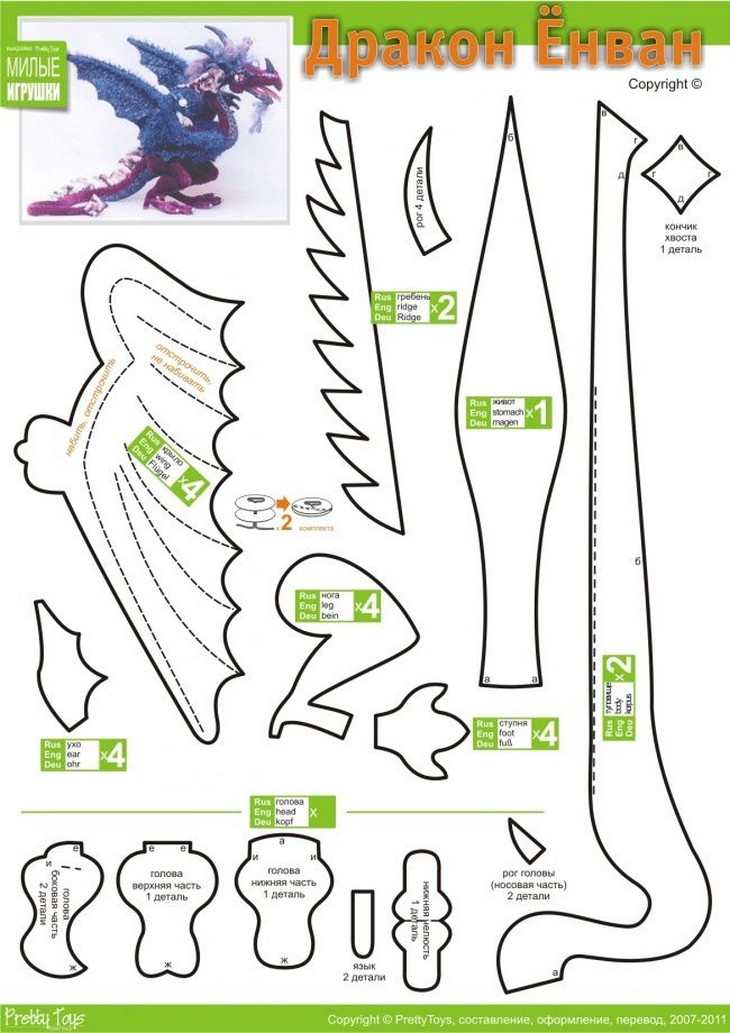
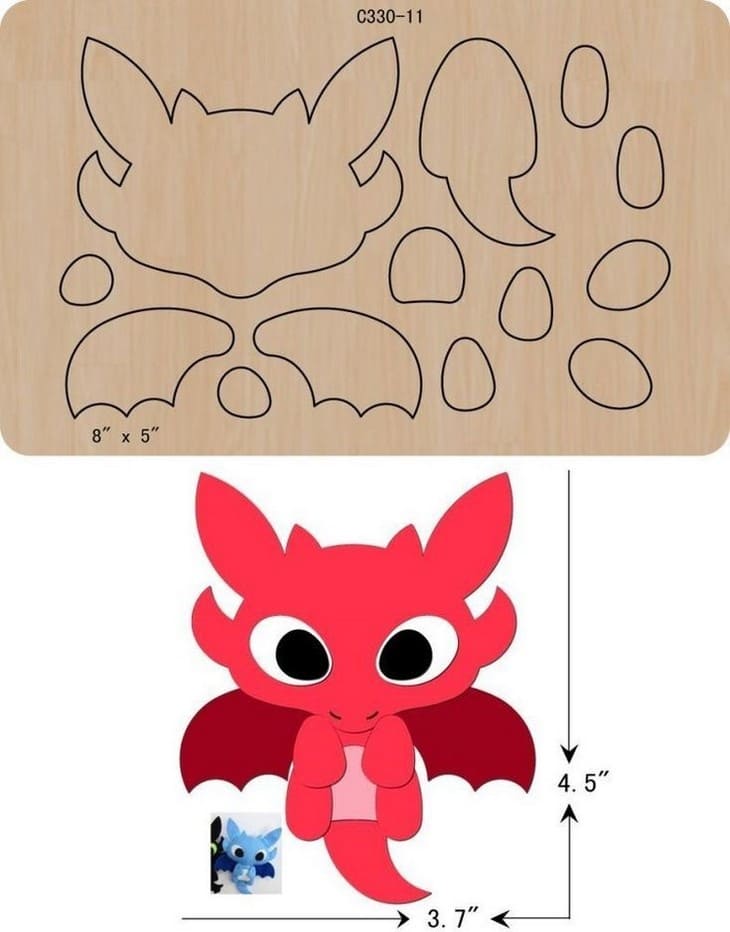
Dragon on a Christmas tree made of foamiran
Bright, voluminous Christmas tree decorations are made from foamiran. Working with this material requires a certain skill, but the result is worth it. Shiny glitter foamiran is best suited for a New Year's dragon.
You will need:
- part templates;
- foamiran in green, red, yellow and white;
- hot melt glue;
- iron;
- manicure scissors;
- tweezers;
- thin braid.
How to do:
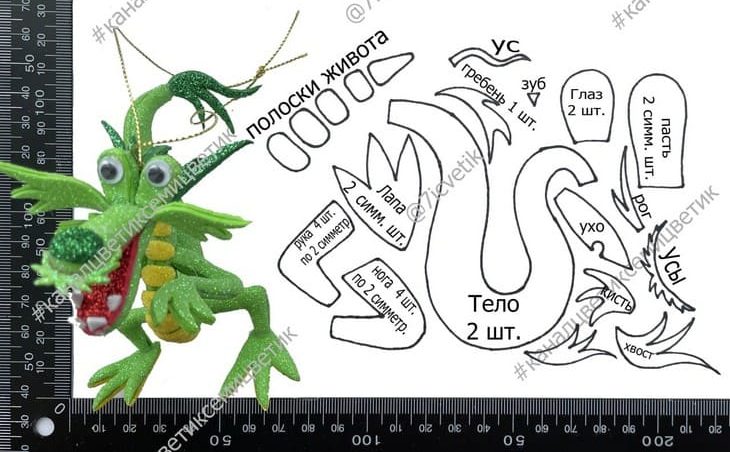
- Trace and cut out the details of the future foamiran toy using the template.
- Heat the parts of the legs, feet, arms, jaws, eyes and body on an iron to give them volume.
- Glue symmetrical parts of the body, arms and legs together end to end.
- Glue yellow elements onto the belly.
- Use hot glue to attach the arms and legs into place.
- Duplicate the flat parts with foamiran of the same color so that they become denser and shine on both sides.
- Glue the eye parts onto green foamiran, the jaws onto red, and the feet onto yellow. Let the parts dry well and carefully cut out the outline with manicure scissors.
- Glue the feet to the dragon's legs.
- Assemble the head - glue the jaws at an angle to each other, glue the teeth.
- Place eyes, horns and sideburns on the back of the head. Connect the head (jaws) to the body.
- Glue the spine details from the head down the back.
- Glue the hands.
- All that remains is to attach a thin ribbon to hang the toy on the tree.
It is necessary to ensure that the paired parts are the same size and fit each other perfectly.
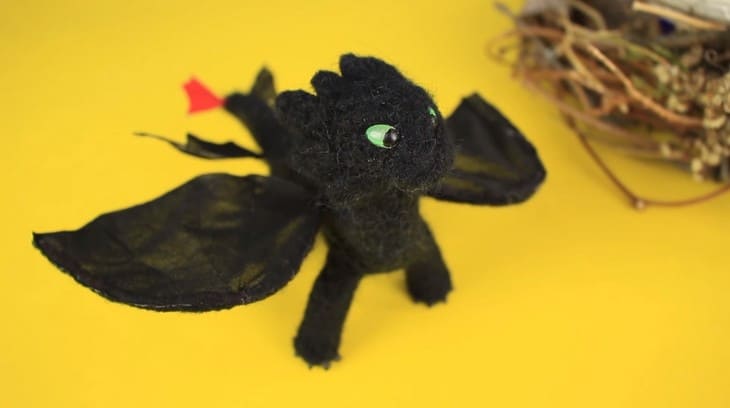
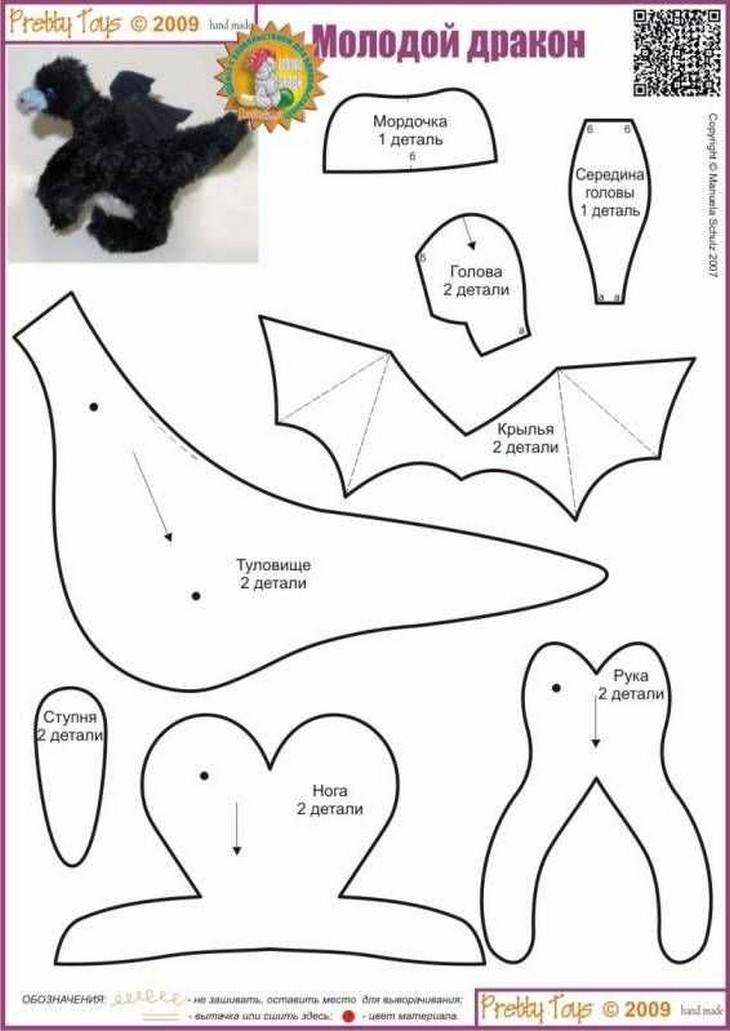
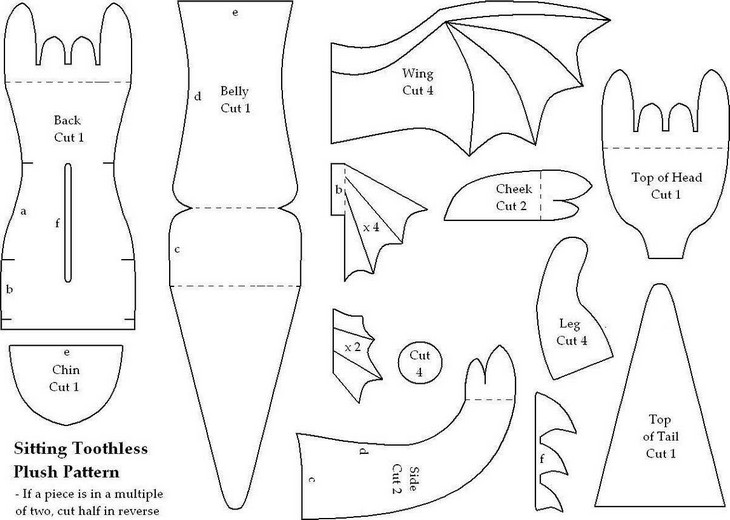
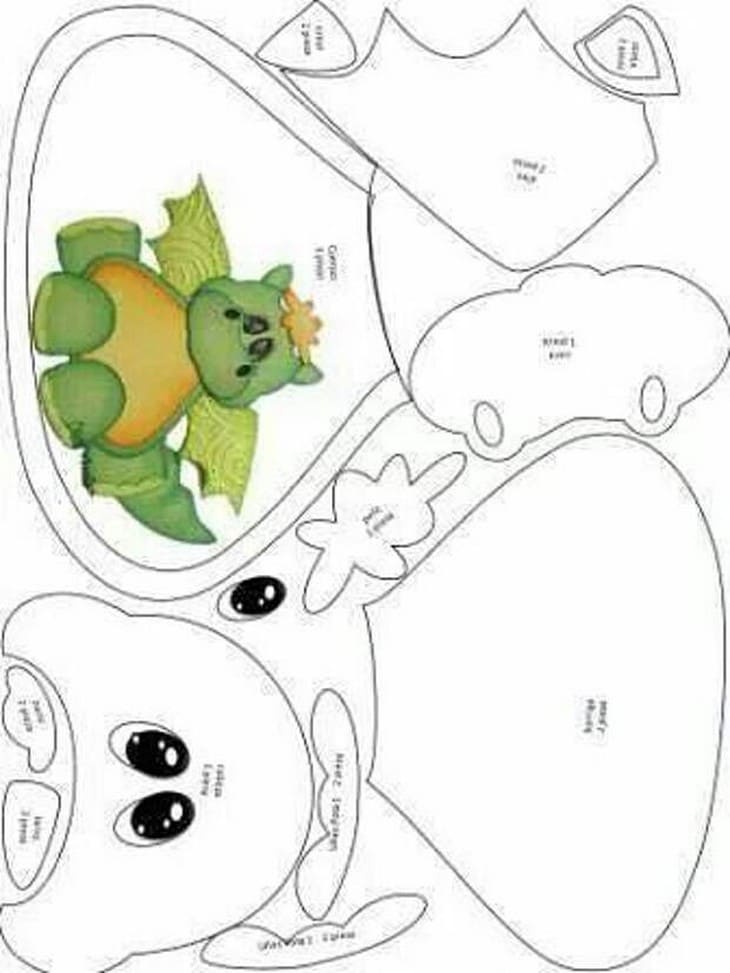
The dragon is a soft toy
The cute dragon Toothless from the famous cartoon is not at all difficult to make with your own hands. Wool and needles for felting can be bought in any handicraft store.
You will need:
- black wool;
- black threads;
- black synthetic jersey;
- red satin ribbon;
- synthetic padding;
- felting needles No. 25 and No. 40;
- a large piece of furniture foam;
- glue gun;
- thick and thin wire;
- pliers;
- lighter;
- green and black nail polish.
How to do:
- Felt a blank from the padding polyester in the form of an elongated cone. You need to start felting with a thick triangular needle, and then continue working with a thinner needle No. 40.
- Cover the synthetic base with black wool and felt with a thin needle.
- Felt the remaining parts from black wool - four paws (four identical sausages), a head (a flattened ball) and a neck.
- First felt the neck to the head, and then to the body.
- Felt the paws to the body.
- Make three pairs of horns - one larger and two smaller. Felt them to the head.
- Using a hot glue gun, form claws and two eyes - squeeze the glue onto a piece of cardboard and let it harden.
- From a piece of thick wire, form the frame of large wings and screw pieces of thin wire-membranes to them.
- Wrap the thick wire of the frame with black thread.
- Glue the frame onto thin knitwear and trim with scissors.
- Make a smaller frame from thin wire for the second and third pair of wings. Glue to the knitwear and cut out the contours of the wings with scissors.
- Color the thin wires with a black marker and sew the wings onto the dragon with black thread.
- Paint the frozen eye shapes with green nail polish and the nails with black.
- Glue the eyes onto the head (draw black pupils) and the claws onto the paws.
A wonderful dragon is ready, such a talisman will be a wonderful gift not only for a child, but also for an adult.
For the third pair of wings we use black knitwear and red satin ribbon.
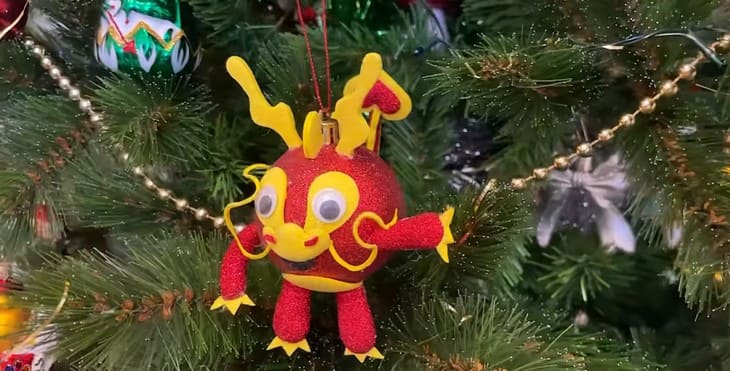
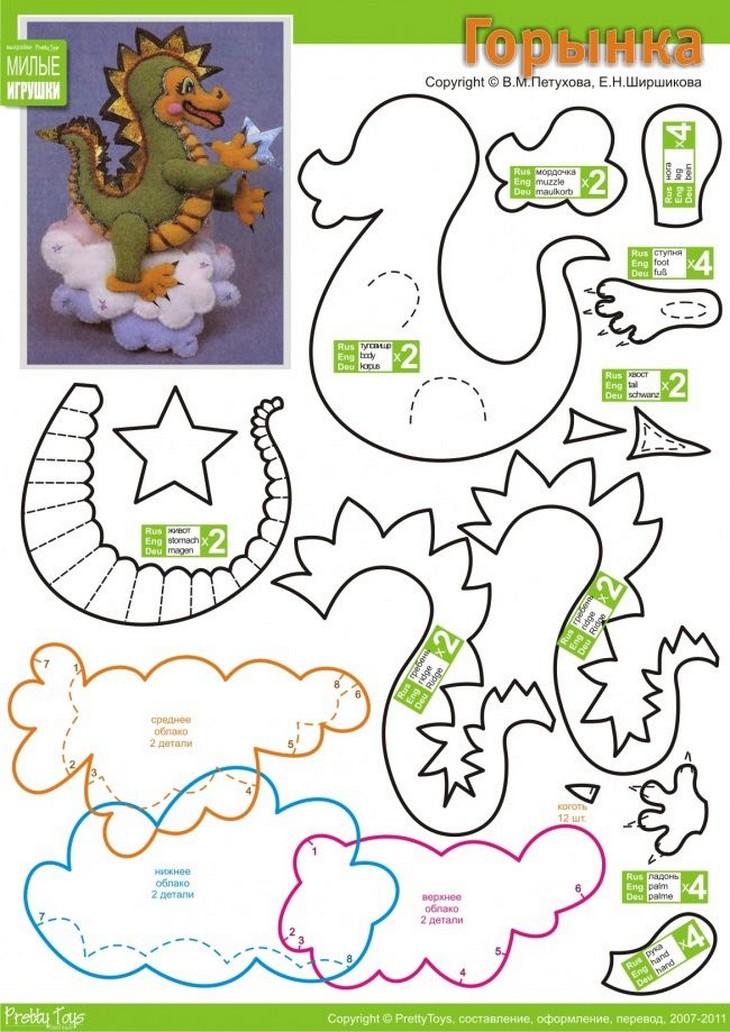
Dragon - Christmas tree toy
New Year is approaching, and you still don’t have a talisman for the coming year – this is easy to fix. The most ordinary ball will literally turn into a charming cute dragon in half an hour and will become a real decoration for the Christmas tree.
You will need:
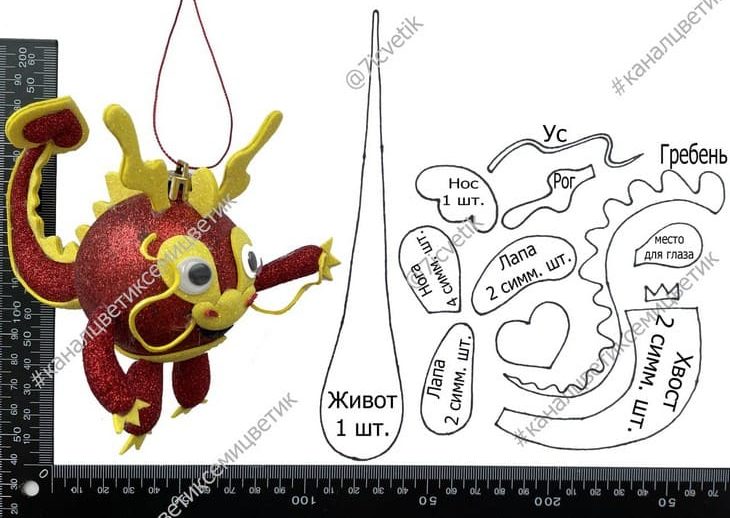
- part templates;
- shiny Christmas tree ball with a circumference of 19 cm;
- glitter foamiran in the color of the ball;
- yellow foamiran;
- heat gun;
- scissors.
How to do:
- Cut out all the parts according to the template.
- We duplicate the horns, comb and the base of the tail tip with foamiran of the same color. This way the details will become denser and will shine on both sides. Carefully cut along the contour.
- Heat all other parts on an iron to give them volume.
- Glue the symmetrical parts of the paws and tail together.
- Make a volumetric heart.
- Glue the bases of the eyes and nose onto the ball.
- Adjust the base of the tail to the curve of the ball and secure with hot glue.
- Glue on the yellow belly and the lower part of the tail.
- Attach the comb and heart to the tip of the tail.
- Glue the horns above the eyes.
- Attach claws to the paws and glue the paws to the ball-shaped body.
- Glue a mustache to each side of the nose.
- Bring your craft to life with ready-made eyes.
- There are only small details left - the nostrils and mouth.
- The fire dragon is ready, you can hang the bright toy on the Christmas tree.
Please note that the paw parts should be the same size after heating.
Dragon made of foil and cotton wool
The tradition of making Christmas tree decorations from cotton wool goes back hundreds of years. Try to create your own unique toy, such a craft will create a cozy atmosphere and bring a festive mood to the house.
You will need:
- thin food foil;
- cardboard;
- sisal wire;
- cotton wool;
- brush;
- stationery knife;
- tools for modeling and sculpting from polymer clay;
- glue gun;
- PVA glue;
- acrylic paints.
How to do:
- Form two blanks from foil - one larger (body) and the second smaller (head).
- Clean the blanks with a stationery knife and glue them together with hot glue.
- Form smaller parts (nose, arms, feet) from foil and glue them to the body and head.
- Attach a comb from sisal wire to the head and back.
- Draw the wing templates on paper, cut them out and apply hot glue along the outline to give them relief. Glue them to the dragon's body.
- Dilute PVA glue with water. Separate the cotton wool into thin layers and tear into pieces.
- Cover the dragon figurine with several layers of cotton wool.
- On the last layer, use modeling tools to mark small details: comb, horns, nostrils, eye sockets, etc.
- Let the figurine dry thoroughly and paint it with acrylic paints.
- Cover the comb and wings with bronze paint, add highlights.
- Let the paint dry well and cover the figure with a layer of PVA.
- The vintage style dragon Christmas tree toy is ready.
Each layer of cotton wool should be soaked in PVA glue using a brush and allowed to dry thoroughly.
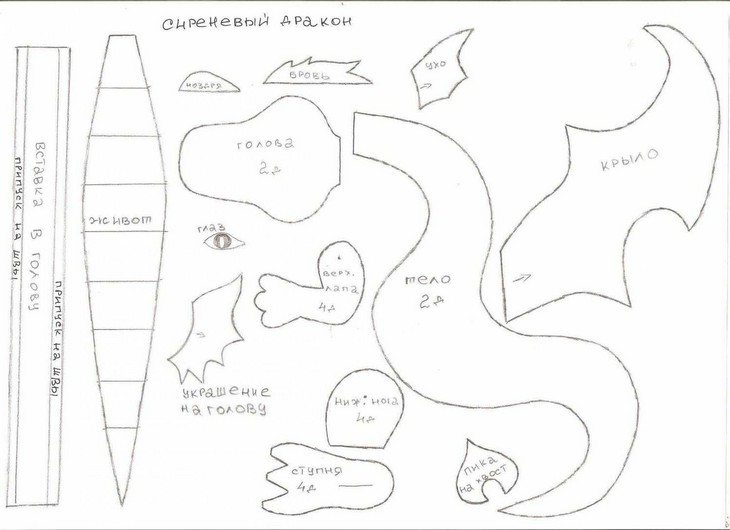
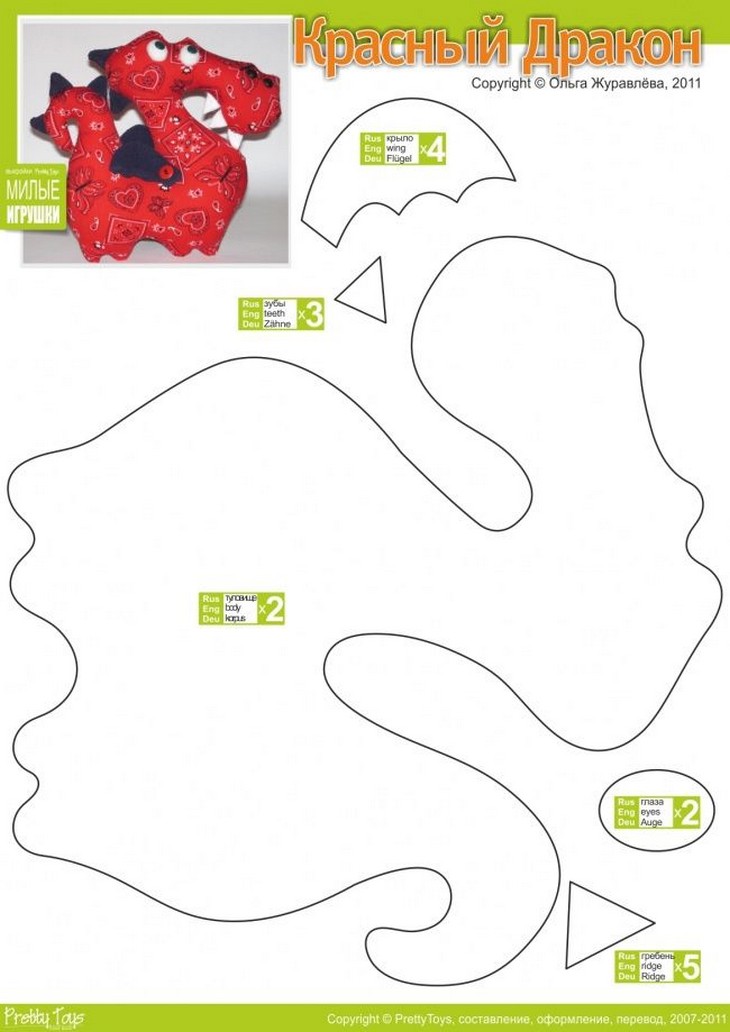
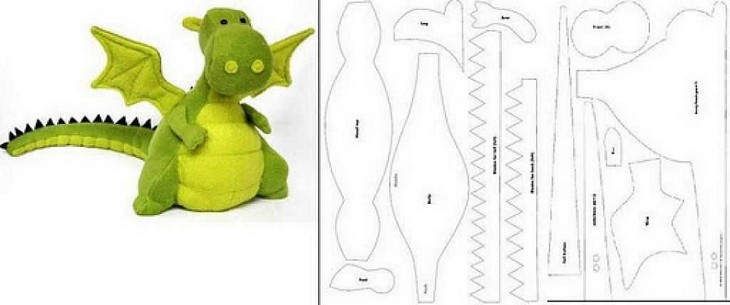
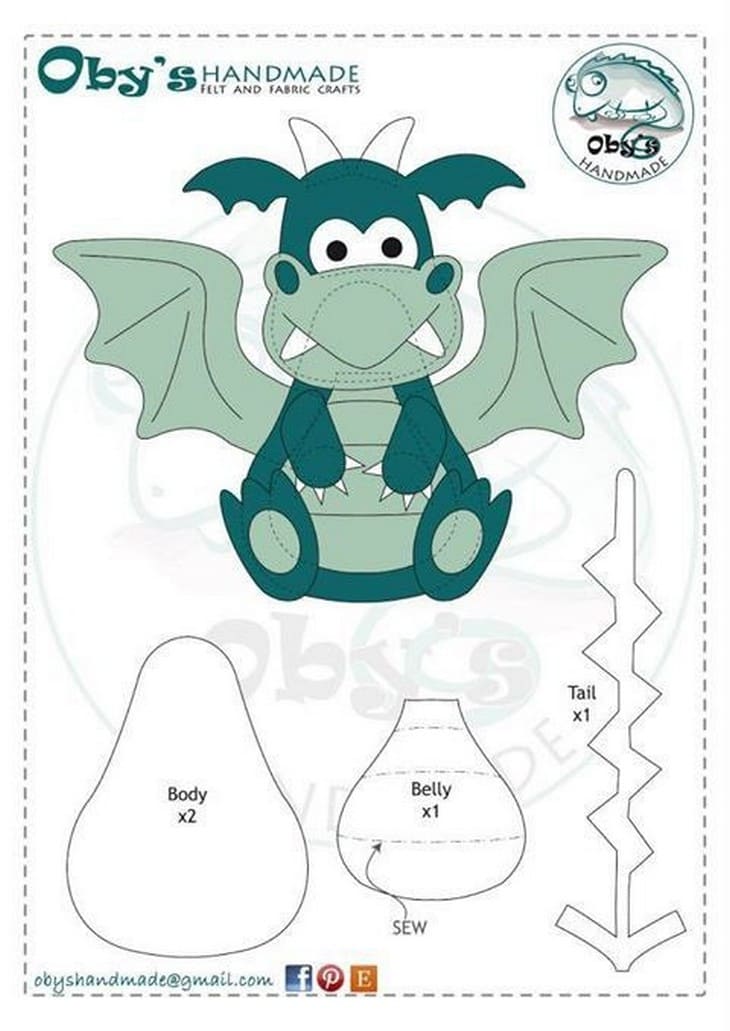
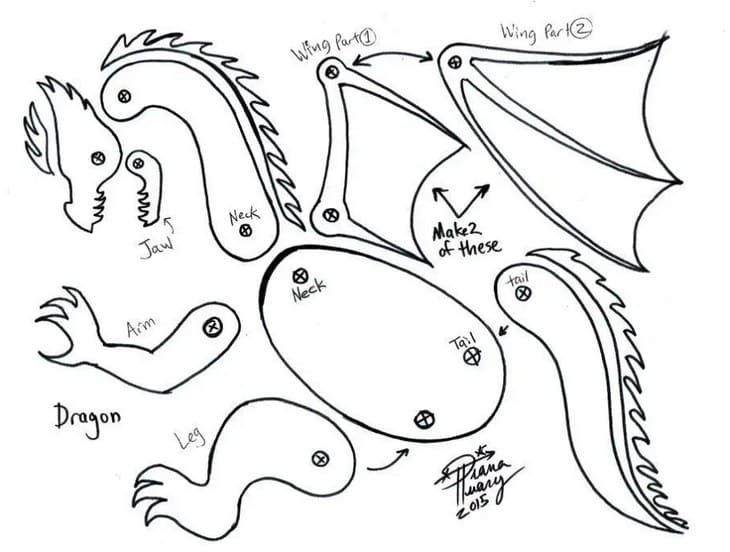
Fabric Dragon Crafts
A soft cozy dragon made of fabric will not leave anyone indifferent. For this craft, you can take any scraps of fabric that can be found in every home, from cotton to brocade - the main thing is to show your imagination.
You will need:
- templates of parts (patterns);
- fabric 2-3 colors;
- needle, thread;
- scissors;
- synthetic padding or holofiber;
- eyes or beads;
- glue.
How to do:
- Transfer the patterns of the parts onto the fabric, make seam allowances. The patterns can be transferred using chalk, a piece of soap or a special disappearing pencil onto the wrong side of the fabric.
- Cut out all the pieces with seam allowances. Make notches in the corners of the pieces.
- First, small parts (paws, ears, tail) are sewn and filled with filler, and then larger ones (head and body).
- The parts must first be swept or pinned together, aligning the stitching lines, and then stitched on a sewing machine, leaving an opening for stuffing with synthetic padding.
- Turn the finished dragon body right side out, straighten the corners. Stuff the parts with filler and sew up the opening.
- Decorate the face - insert or sew on eyes, tighten, etc. Sew or glue on decorative elements.
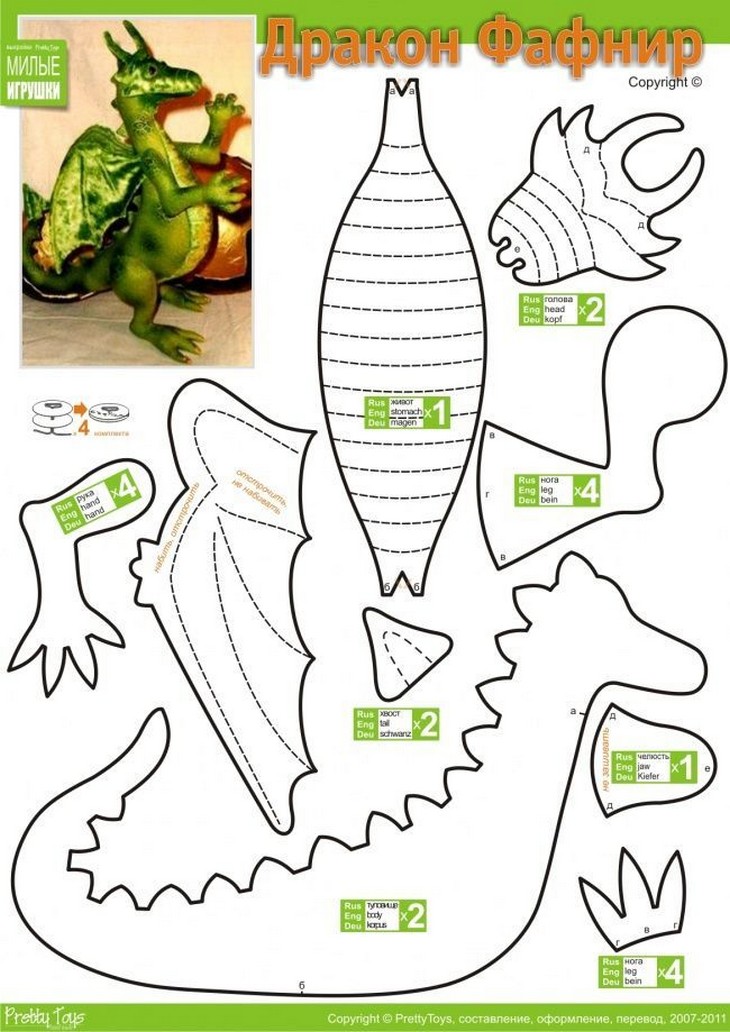
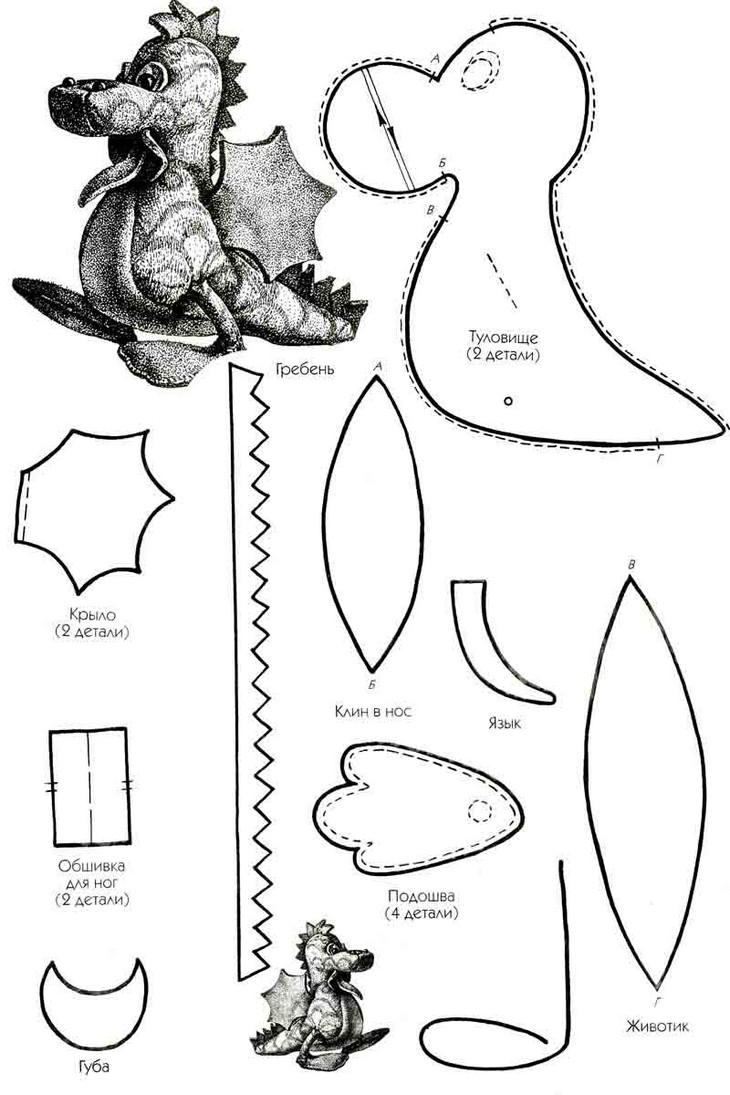
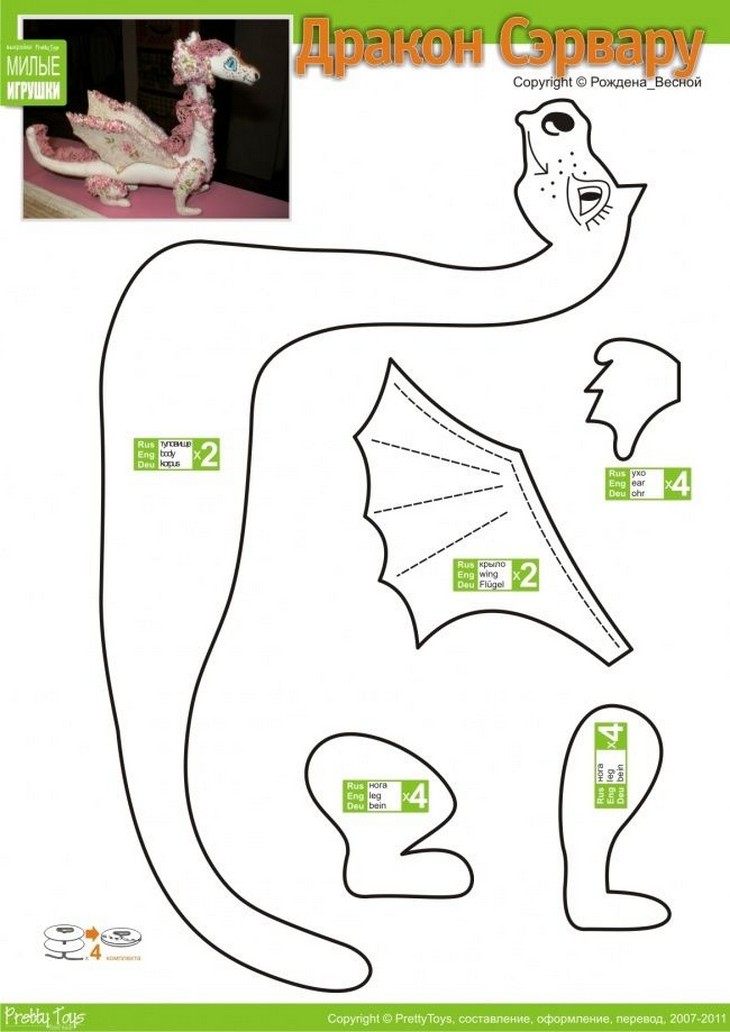
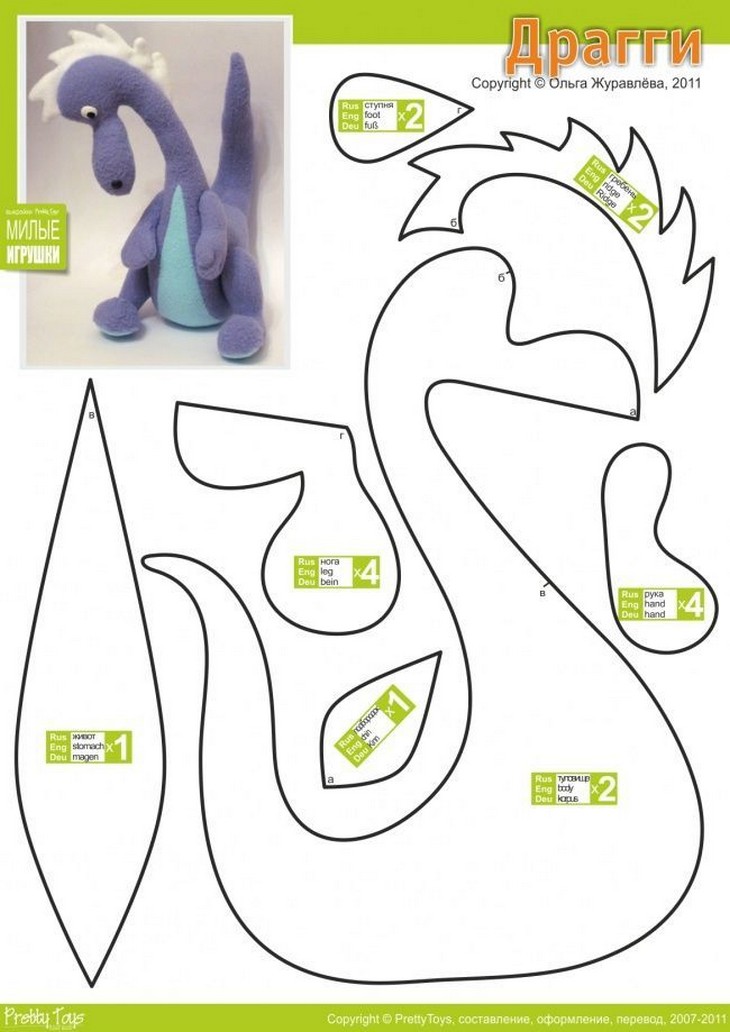
Pay special attention to paired pieces - they need to be cut out in mirror image and to pieces that have fold lines (usually indicated on patterns by a dotted line).
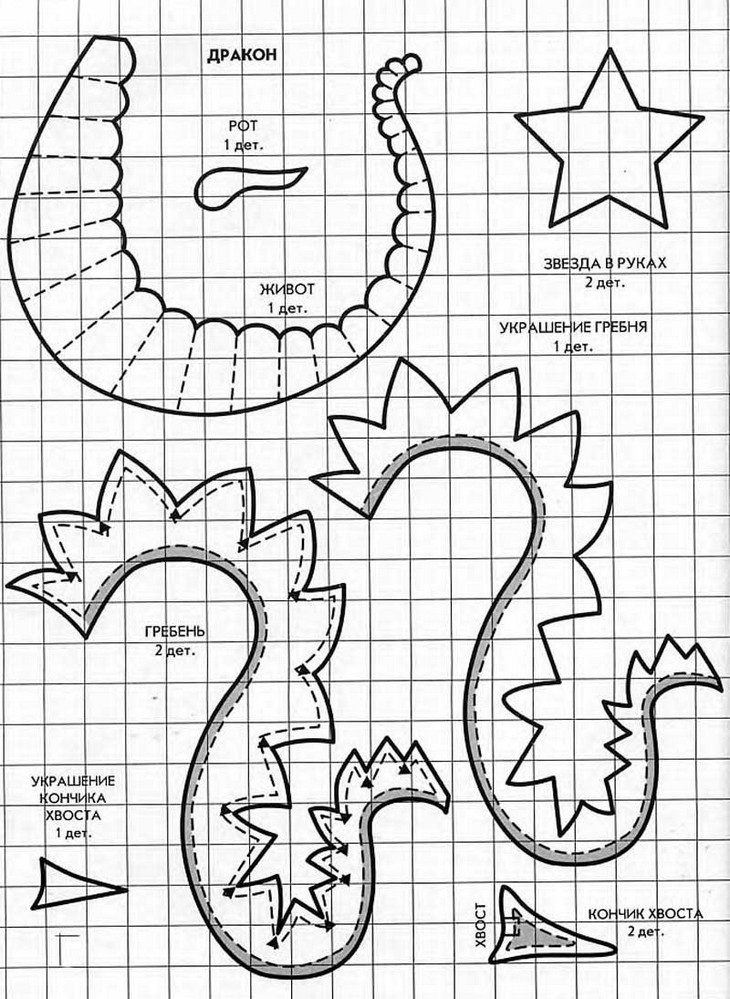
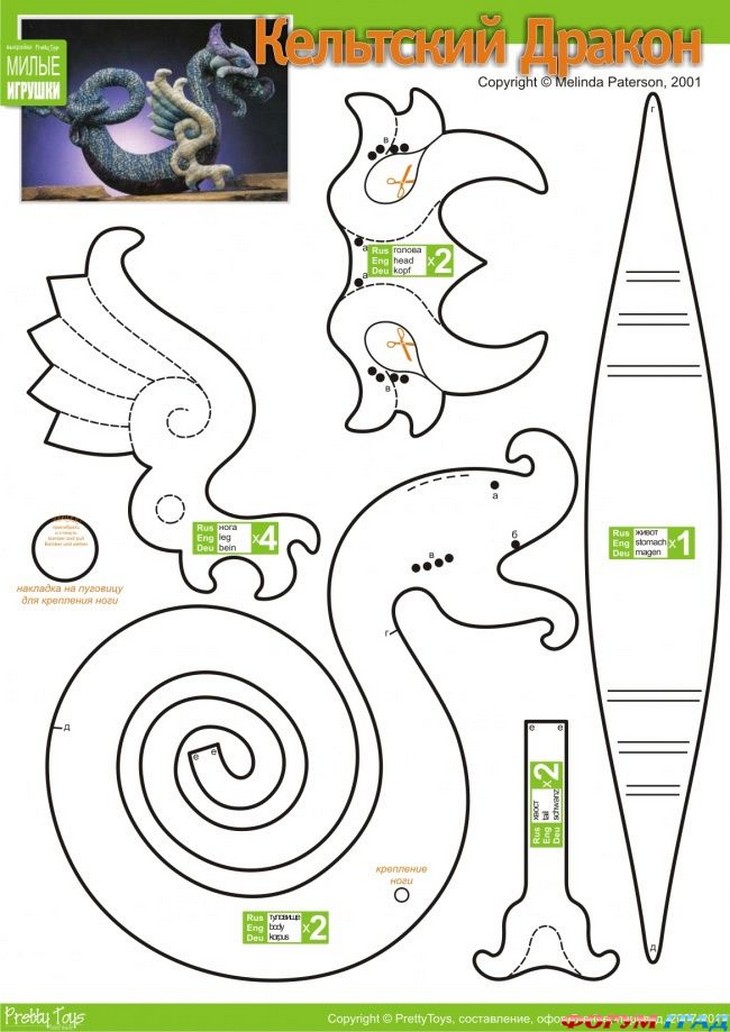
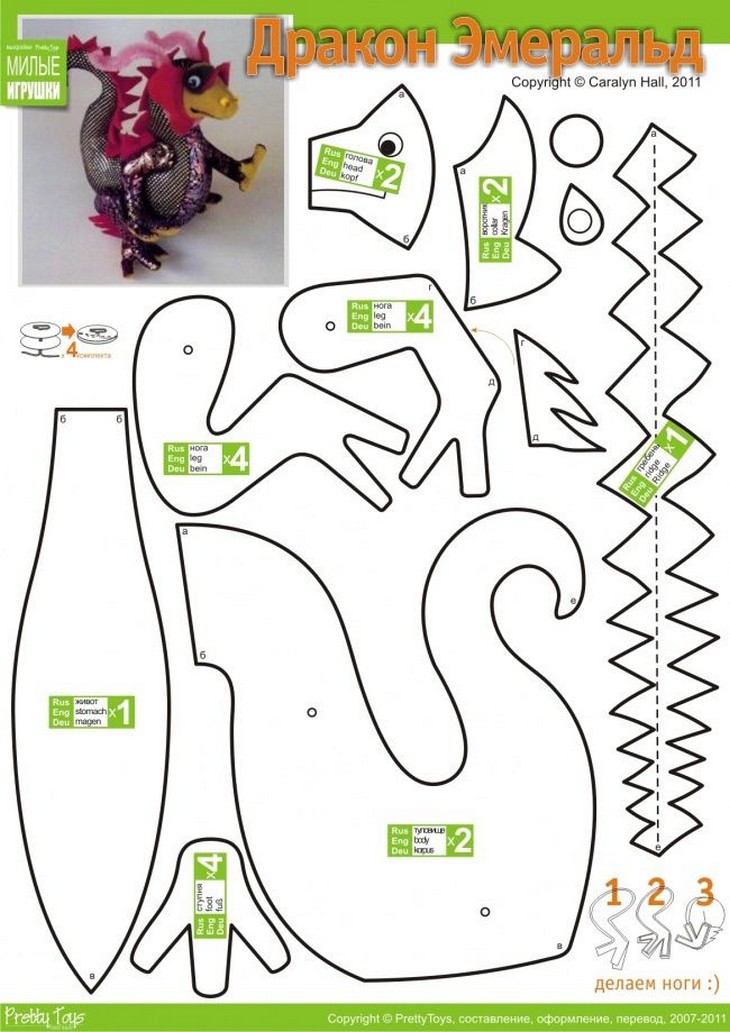
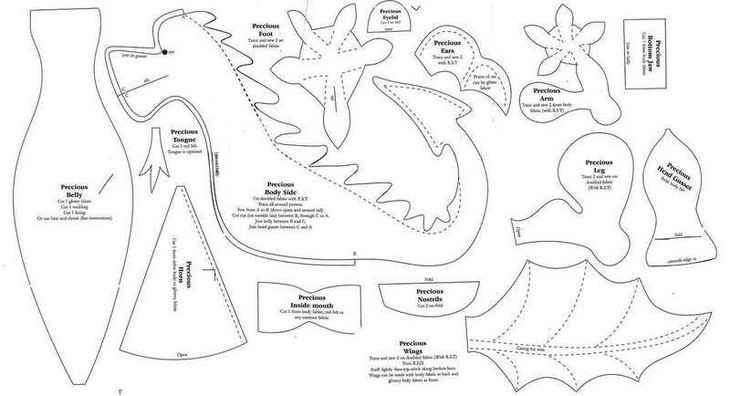
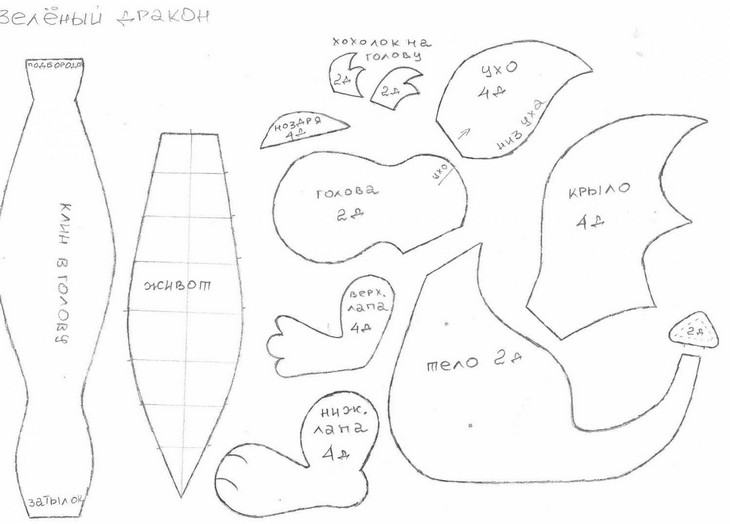
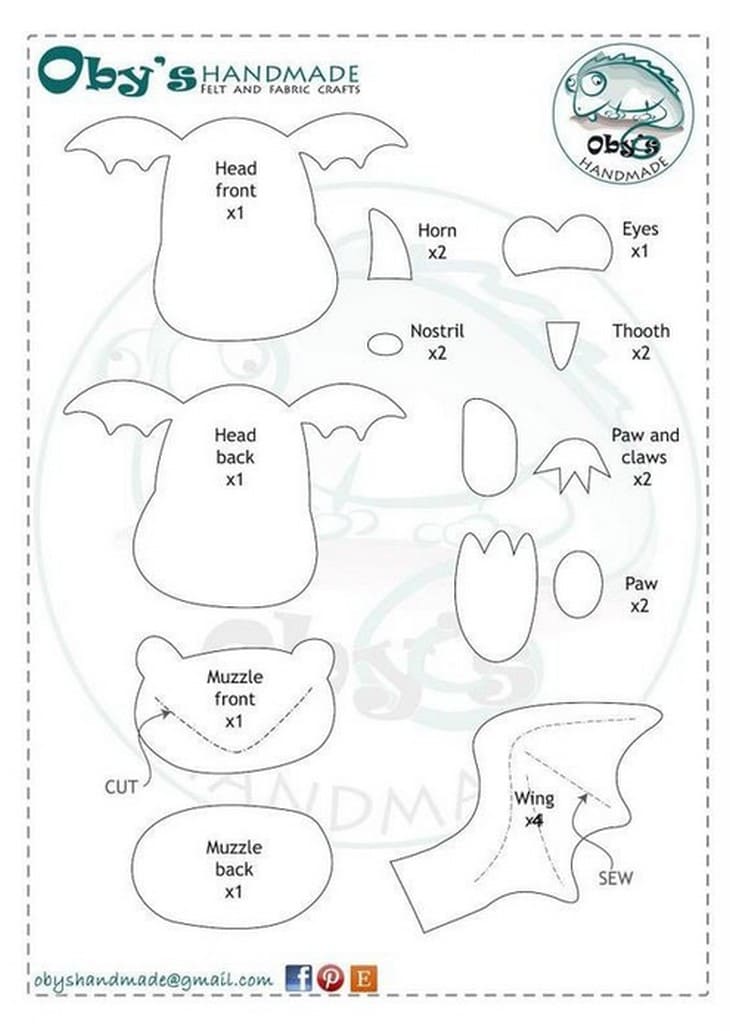
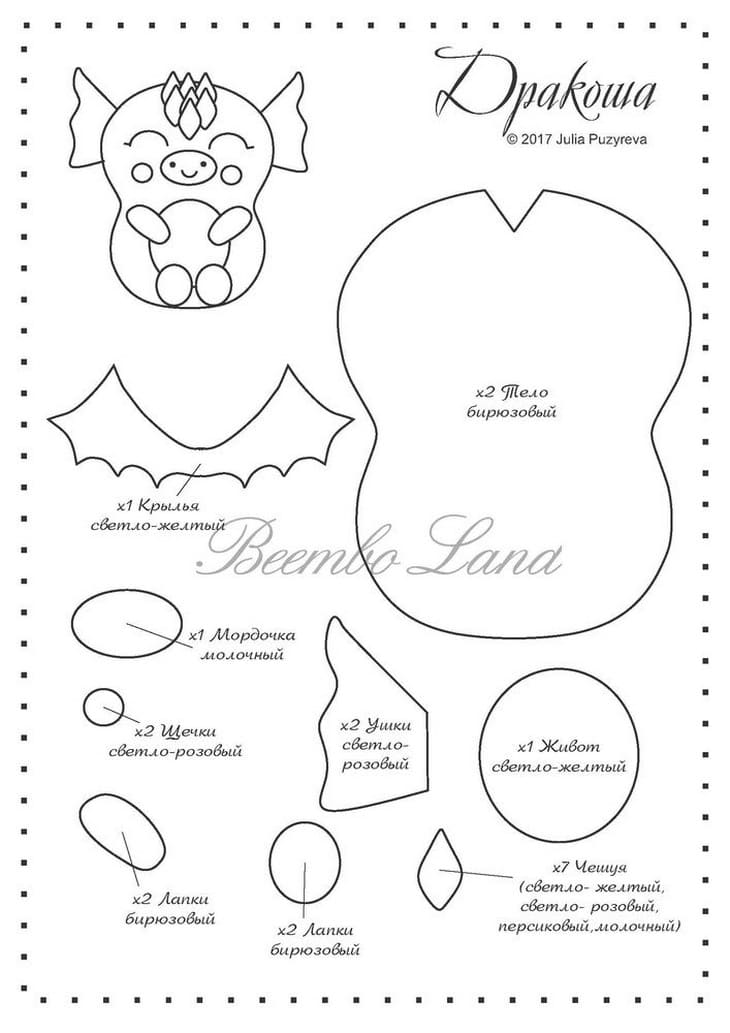
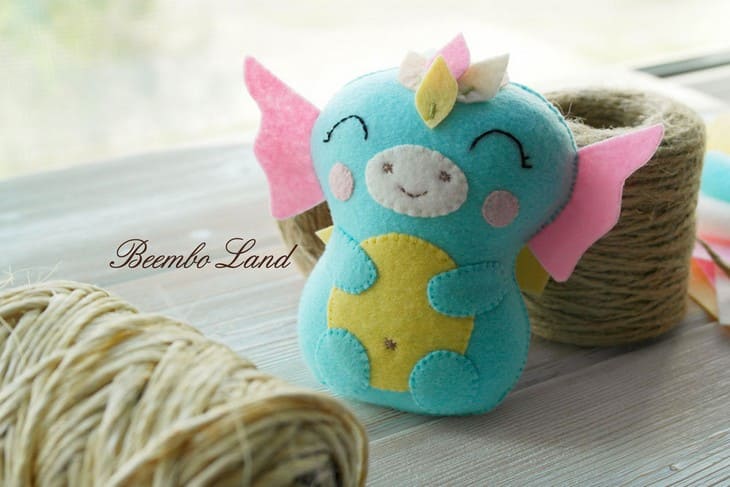
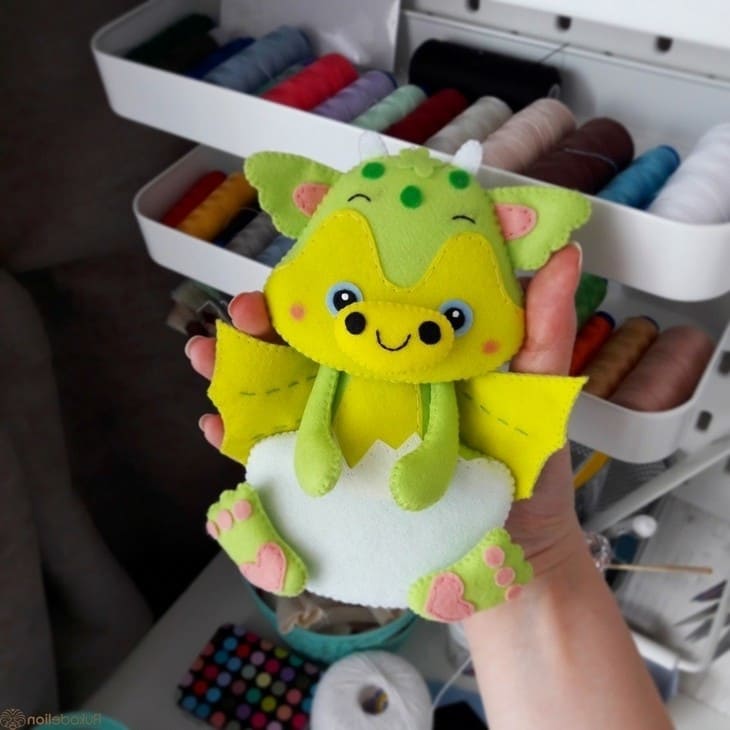
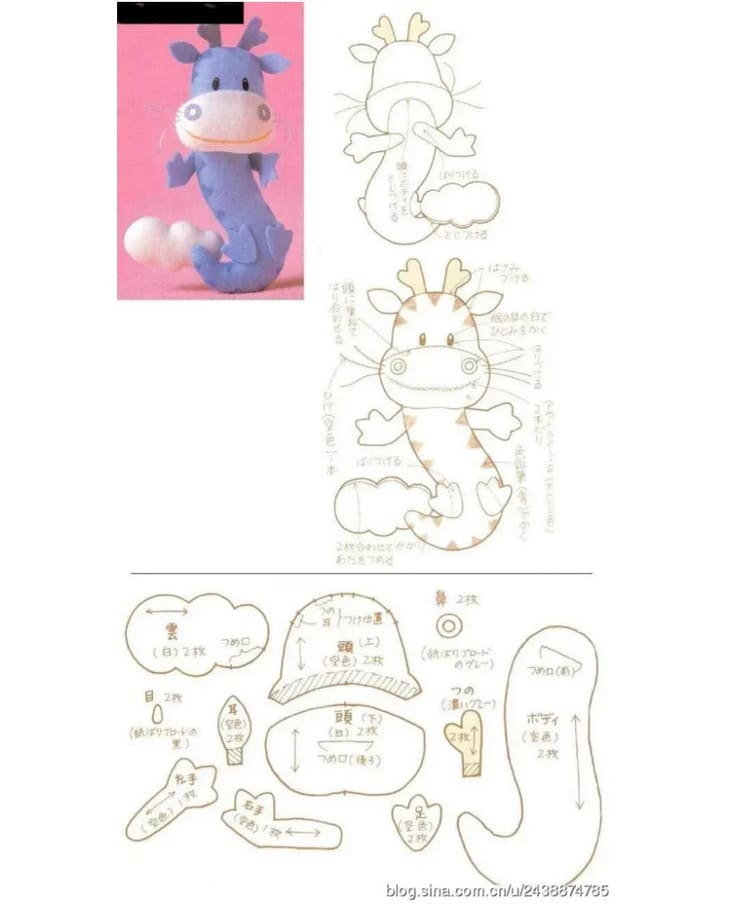
Felt Dragon Patterns
Even beginner needlewomen can make a felt craft for the New Year. Felt does not crumble like regular fabric and holds its shape well. A felt souvenir in the form of a Dragon can be placed on a Christmas tree, made into a keychain or pendant and presented as a small New Year's gift.
You will need:
- felt;
- scissors,
- heat gun;
- thread and needle;
- rhinestones and beads for decoration.
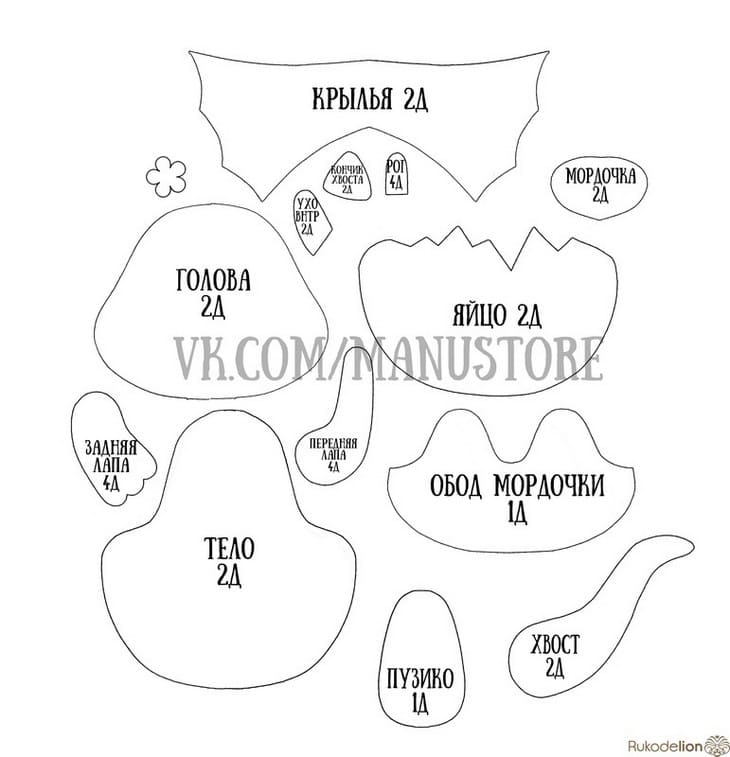
How to do:
- Cut out the main blanks according to the templates.
- Sew or glue on beaded eyes.
- Glue small parts (ears, horns, paw and tail parts) using a hot glue gun.
- Decorate the dragon figurine to your taste - sew or glue on shiny sequin scales, embroider the wings with glass beads or seed beads, etc.


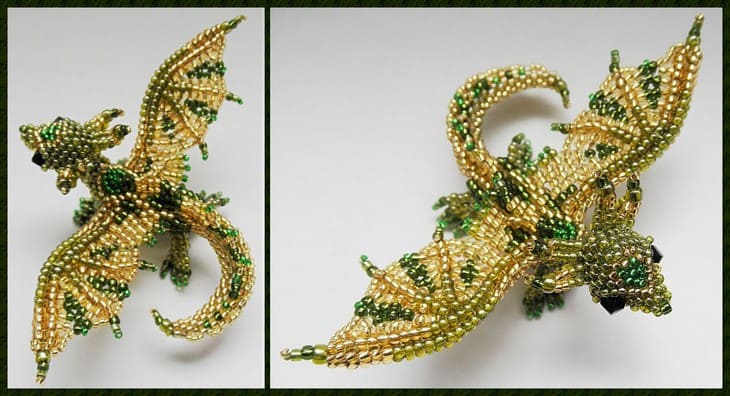
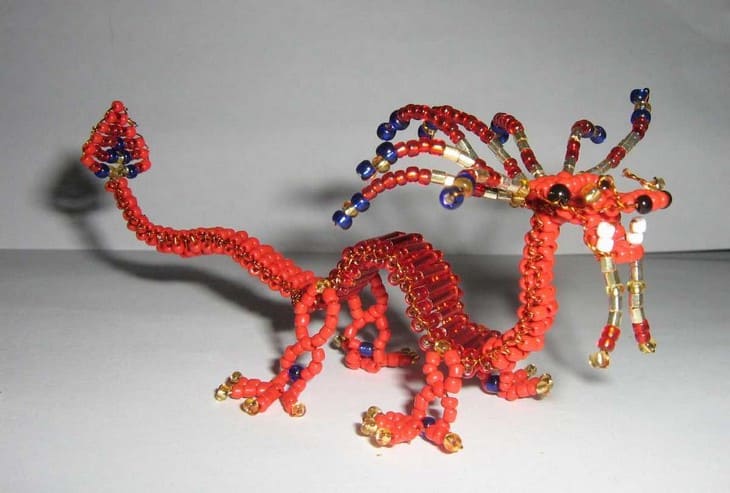
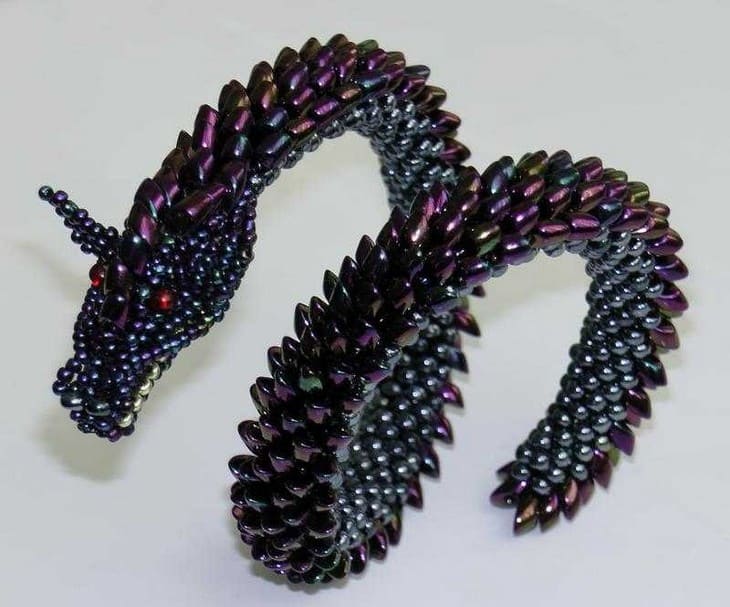
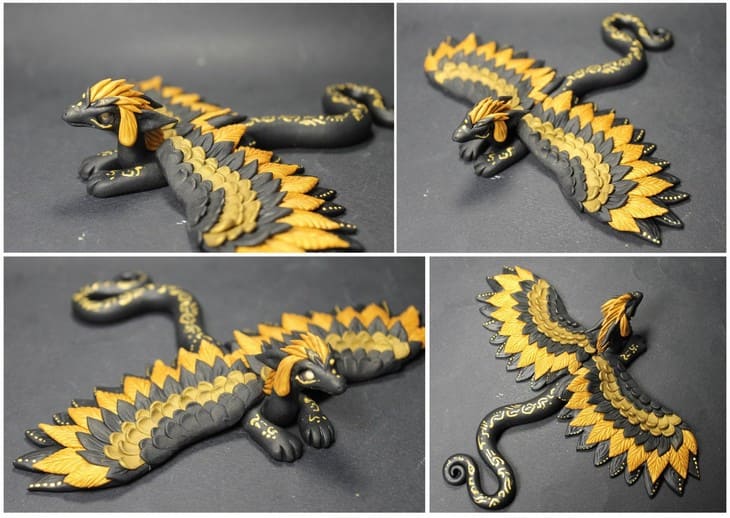
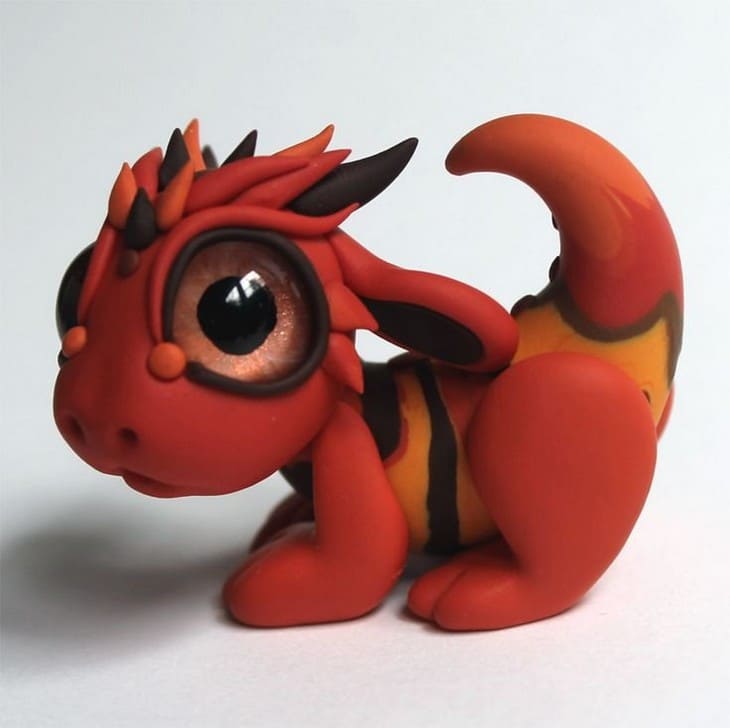
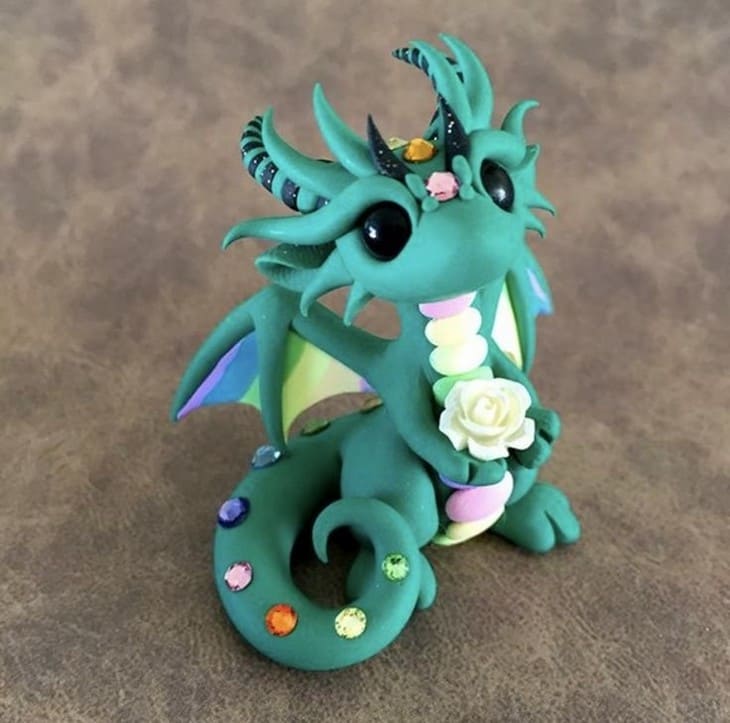
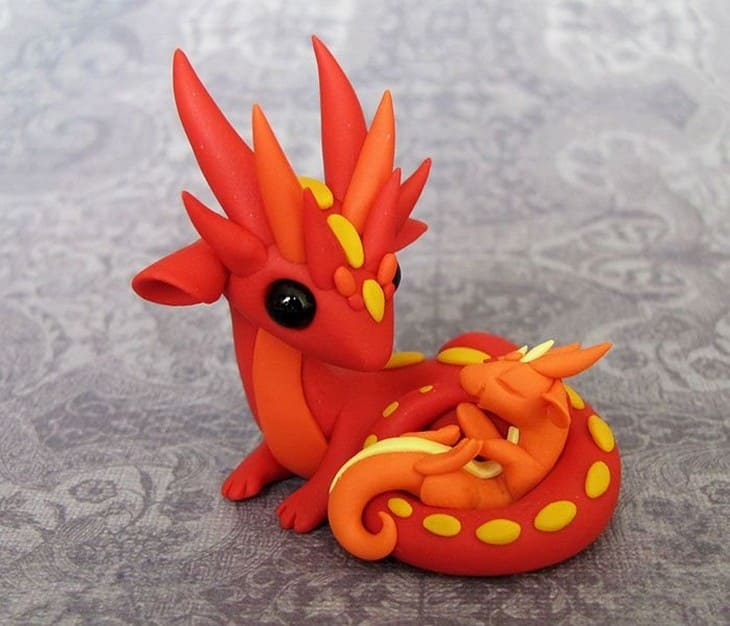
Dragon Ideas from Different Materials
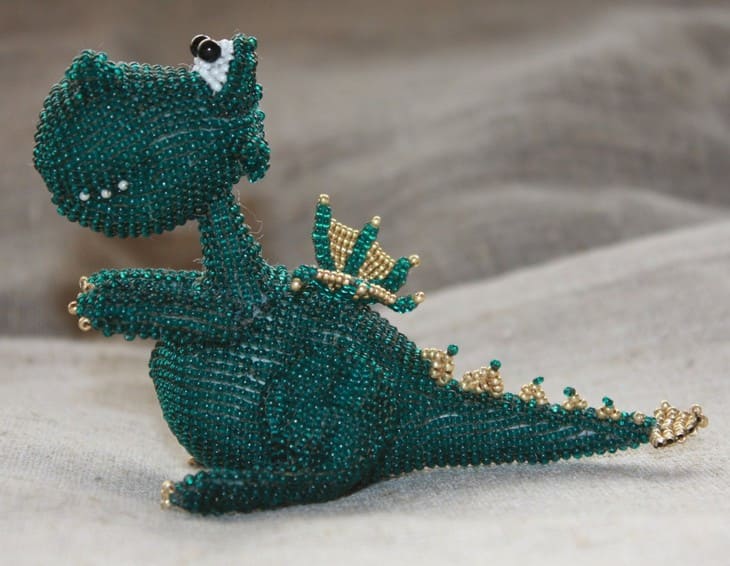
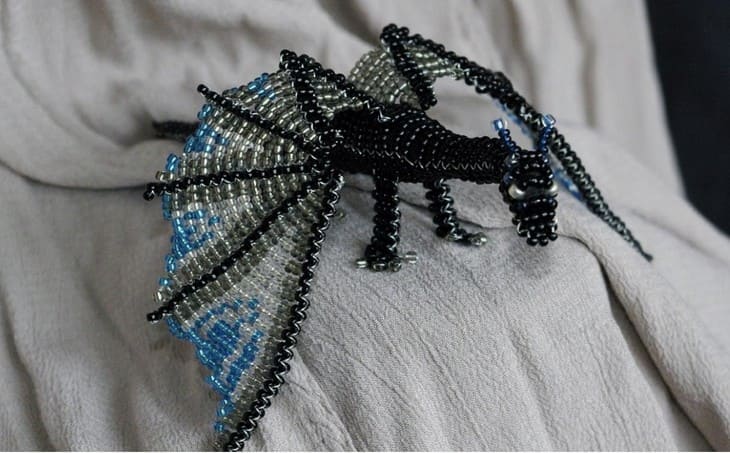
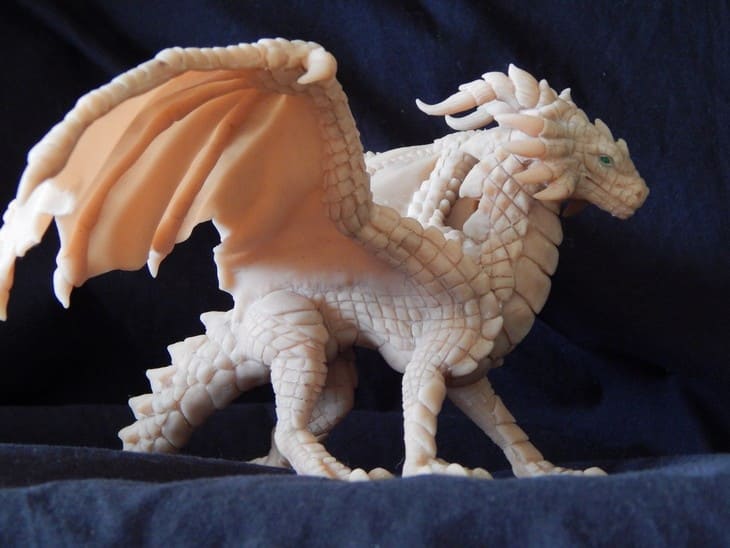
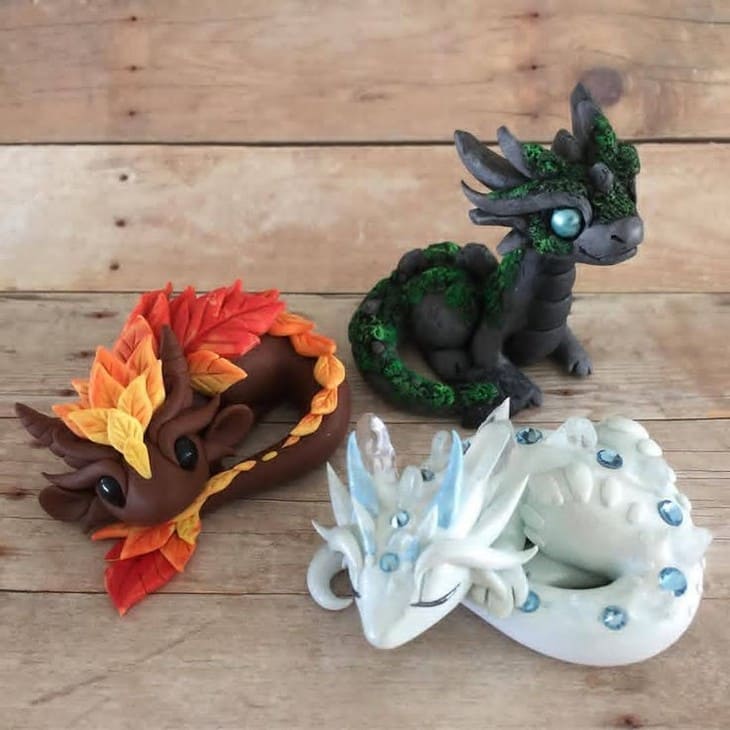
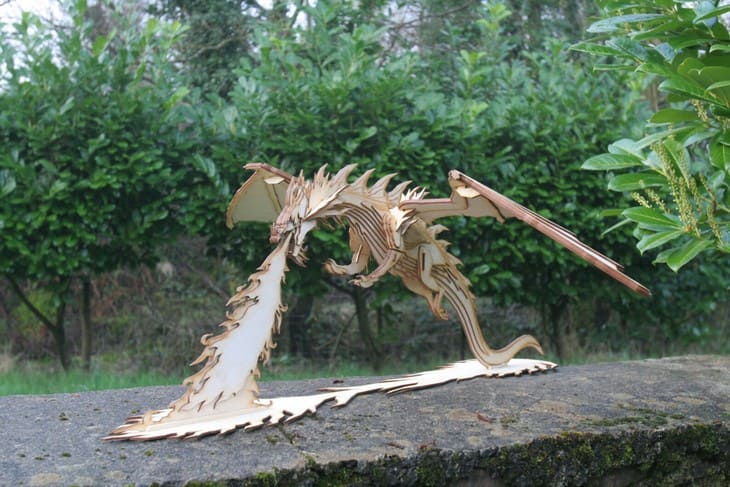
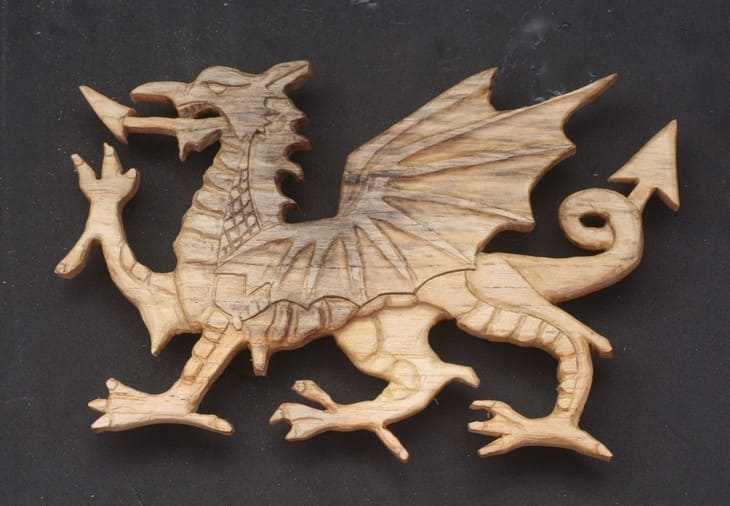
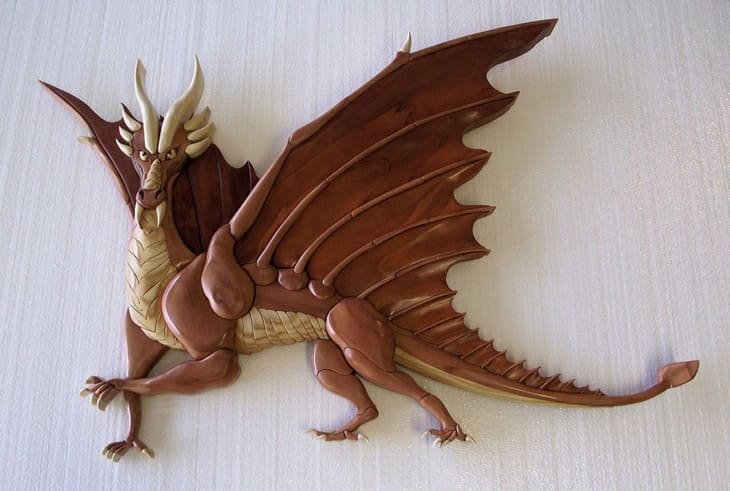
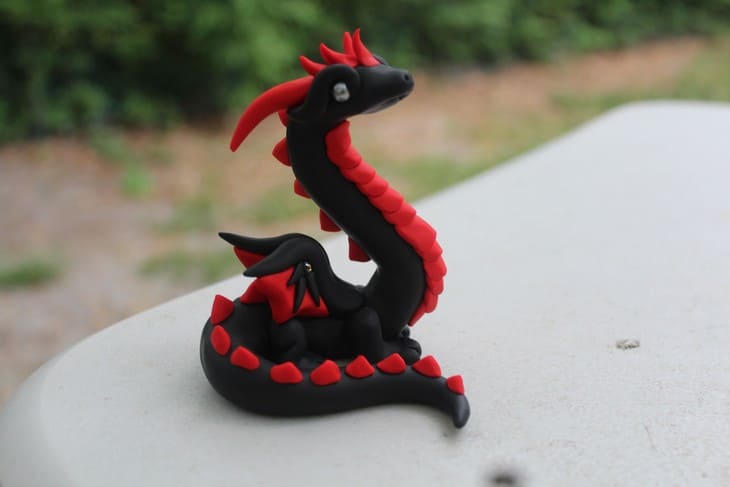
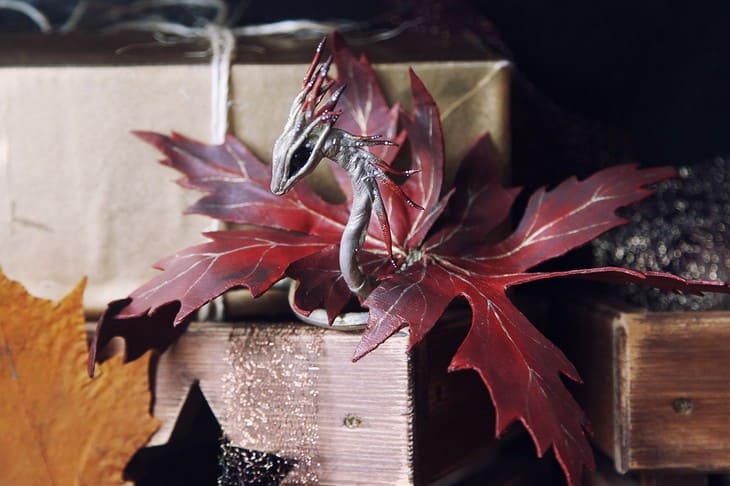
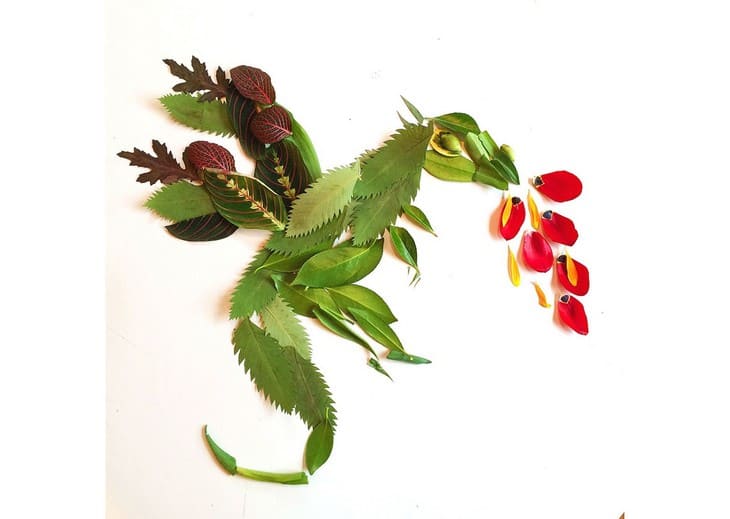
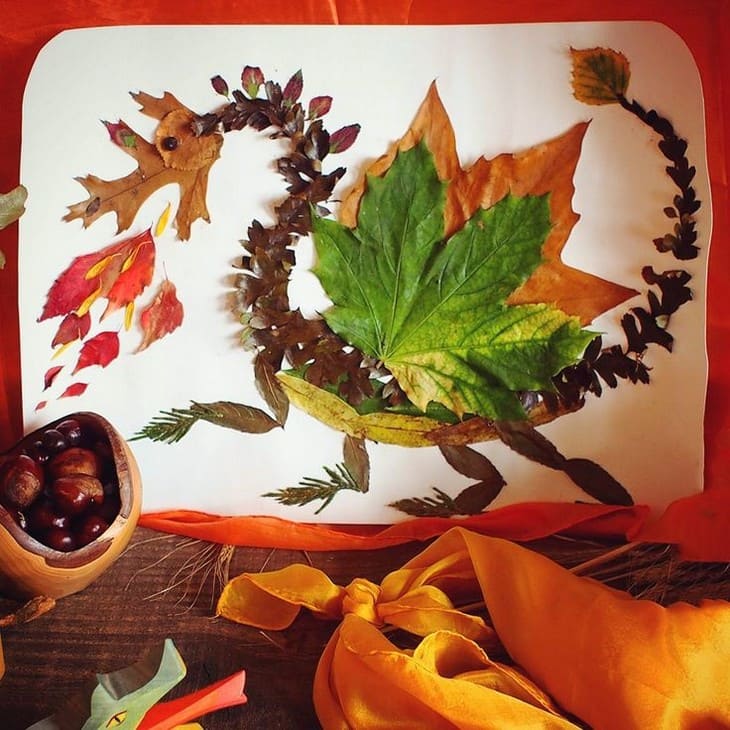
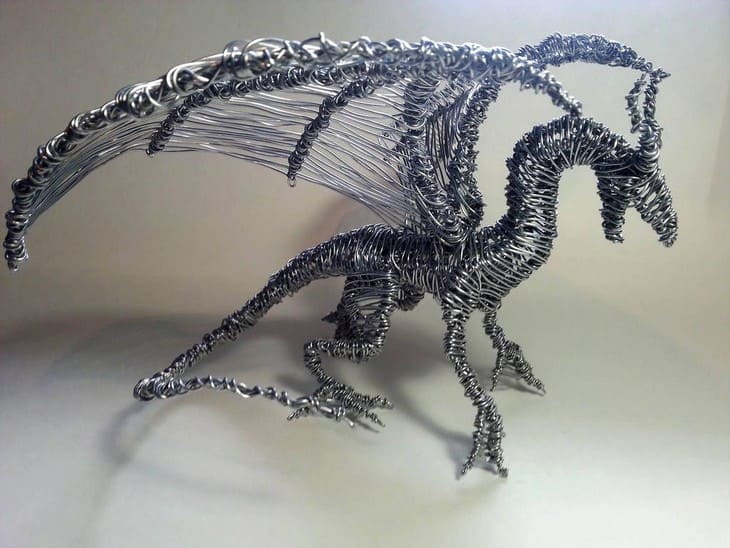
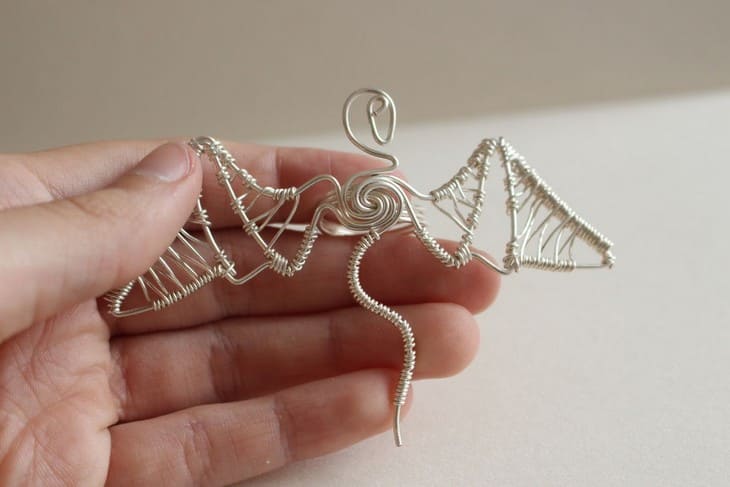
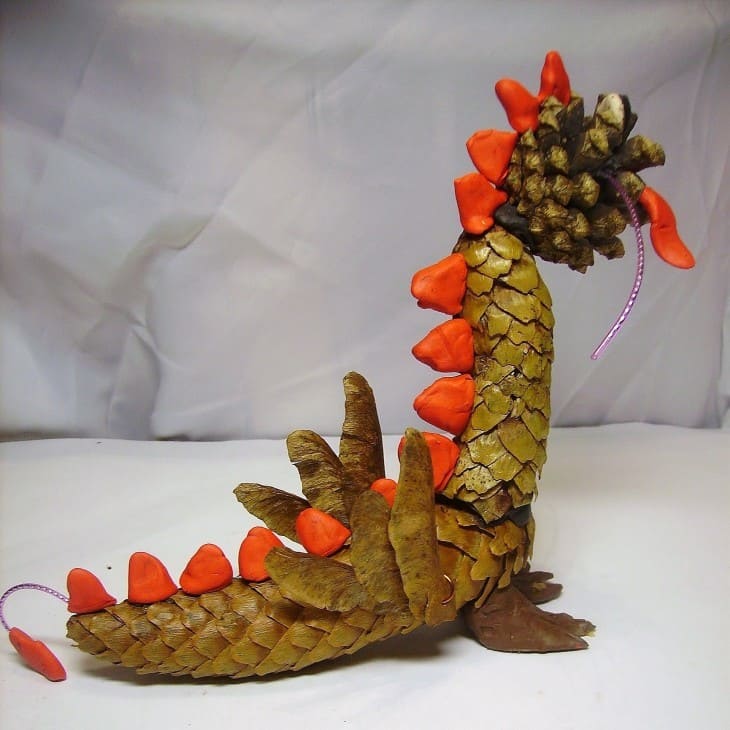
We offer ideas on how to make a dragon using a variety of techniques and materials. Such crafts will be a wonderful gift or decoration for a New Year's interior: exquisite forged wire jewelry, beaded pendants and bracelets, clay and wood figurines, cute children's crafts made of pine cones and other natural materials, and plasticine. You can take one of the suggested ideas as a basis or come up with your own unique toy.


TikTok Paper Dragon on Hand
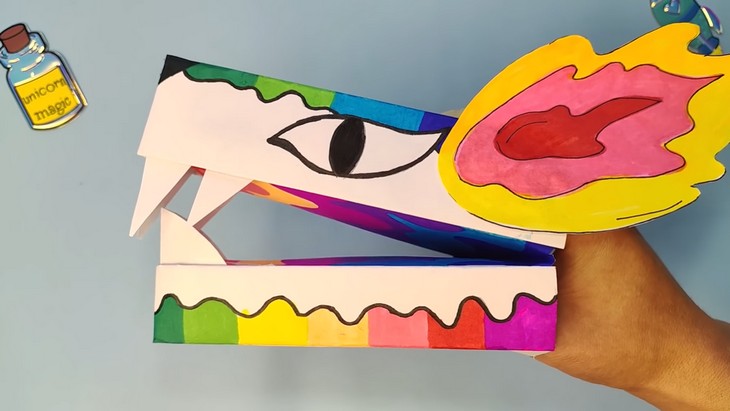
A bright paper toy Dragon that can be put on your hand is perfect for fun parties and New Year's carnivals. Children will surely enjoy making funny dragon faces and then putting on various performances and games with them.
You will need:
- A4 paper;
- glue;
- scissors;
- pencil;
- ruler;
- felt-tip pens.
How to do:
- Take an A4 sheet, step back 3 cm from the long edge, fold into a strip. Secure the strip with glue. You need to make a second similar blank, only with a step back from the edge of 4 cm.
- Fold the strips in half and cut one of them by a centimeter.
- I got two blanks for the dragon's head - upper and lower.
- On the top blank, use a pencil to mark the nose, eyes and pattern. Outline the outline with a black marker and color the dragon's face with felt-tip pens.
- Draw and color a fantasy pattern on the bottom.
- Fold a new sheet in half, put the palm and the head blank. Trace along the contour and cut out two triangles, making allowances of 1 cm on each side.
- Color the triangles with markers and glue them to the strips of paper. This will make the top and bottom of the dragon's head.
- Cut out and glue one large dragon tooth to the bottom part, and two small ones to the top part.
- Take another A4 sheet and draw the blanks for the dragon's mouth using the ready-made parts as templates. You should get one part similar to a rhombus with allowances for gluing. Color the blank with felt-tip pens.
- Using PVA glue, connect the parts of the workpiece and the mouth.
- Draw, color and cut out two dragon ears. Glue them to the top of the head. The dragon is ready.
Chinese Origami Dragon: Video
In Japanese, Chinese and Central Asian culture, making dragon figures is given a special place. There are a huge number of schemes and variants of dragons in origami technique from the simplest ones, which even a preschooler can handle, to real works of paper art.


Оставить Комментарий