On New Year's Eve, there are a lot of worries about installing a New Year tree, preparing a festive table, finding gifts for family and friends. Technical progress and modern industry are ahead of the curve and have long ago come up with and produced solutions to all these issues. But more and more often you want something more soulful and warm, and every day, things made with your own hands are increasingly valued.
Each supermarket will offer a wide variety of garlands, Christmas tree decorations, themed figurines and other decor. But from year to year, the New Year's assortment does not differ much. Chinese decorations are quite affordable, and exclusive glass toys are quite expensive and not everyone can afford them. The same situation is with gifts for colleagues and friends - there is no opportunity to buy everyone a decent gift, and I would not like to give cheap figurines of the year's symbols.
For such creativity, several evenings are quite enough and you will have a unique gift for colleagues and acquaintances who will receive a pleasant New Year's present. A decorated bottle of champagne is just one of the options that can be played out in a New Year's style and get a unique beautiful item for gifts, a prize, or simply put under the tree for the New Year.
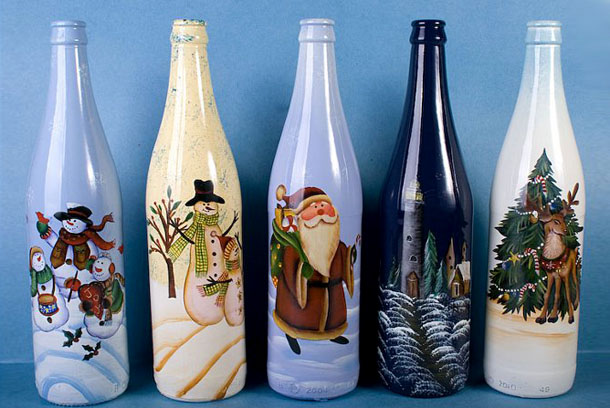
Option #1: Classic decoupage
Paper applique will never go out of fashion in home handicrafts, and every year decoupage firmly takes its place in various decor of objects and interiors. A bottle of champagne decorated in this style is very easy to make.
To decorate champagne you will need the following materials:
- bottle of champagne;
- decoupage napkin with a New Year theme;
- PVA glue;
- white water-based paint;
- blue, pink or white acrylic paints;
- a piece of foam rubber or a household sponge;
- acrylic varnish;
- brush;
- satin or velvet ribbons;
- rhinestones;
- sequins;
- beads.
Step by step instructions
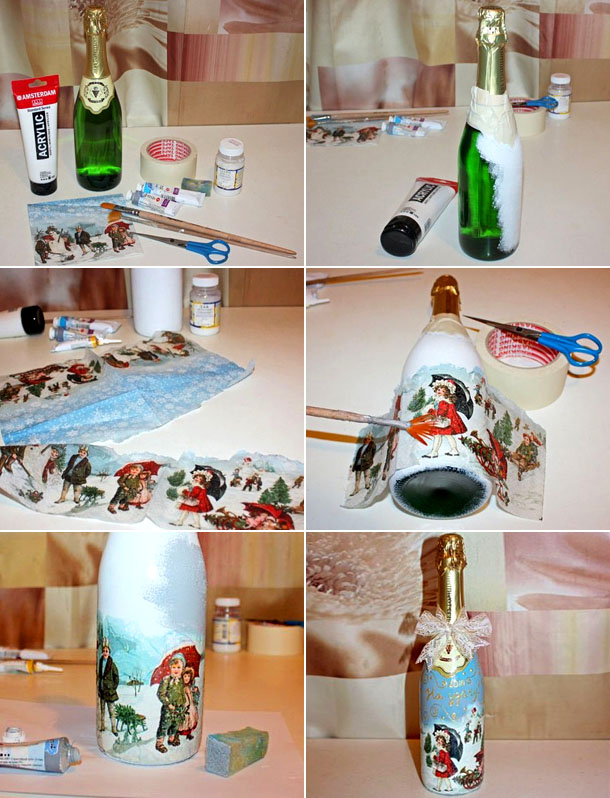
- Before decoupage, you need to prepare the surface of the champagne bottle - remove the label from it. To do this, you need to lower the bottle into a bowl of warm water and soften the paper sticker, which can then be easily removed.
- To avoid damaging or staining the gold foil, before starting work, the neck should be closed or wrapped, for example, with a napkin.
- The dry and clean surface of the bottle should be covered with water-based paint in three layers. Each layer should dry well.
- Using a sponge, apply the base color to the entire surface of the bottle (blue, light green or pink) with acrylic paint.
- PVA glue should be diluted with water in equal parts to the consistency of liquid sour cream.
- You need to cut out figures of New Year characters from napkins and think over the plot. The top layer of the napkin needs to be removed.
- Coat the paper drawings with liquid glue and apply the figures to the surface of the bottle to create a panel. The napkin should lie flat without folds and bubbles, smooth it out with a brush from the center to the edges.
- The design can be given volume: add beads, sequins and rhinestones to the clothes of Snegurochka and Ded Moroz. Tie ribbons around the neck of the bottle. And the spaces between the drawings and decorations can be filled with a frosty pattern using gold and silver acrylic paint.
- After all the decoration, let the bottle dry and cover with acrylic varnish.
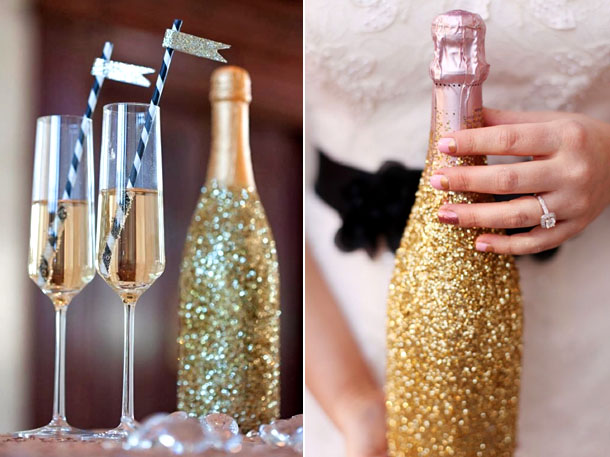
Option #2: Shiny Ombre

In the soft light of candles and garlands, such decor will look magical. In addition to a large bottle of champagne, you can also decorate several small bottles in the same style, then you can give them to guests as a keepsake.
Materials for creating ombre with glitter:
- bottles of champagne;
- vegetable oil;
- baking soda;
- jars with pink and gold (blue and silver) glitter;
- a bottle of PVA glue;
- brush;
- sealant (acrylic spray);
- paper bag.
Step by step instructions

- Tear off the label from the bottle. Mix baking soda with vegetable oil until it becomes a liquid paste. Spread the resulting mixture on the remaining paper and leave for 15 minutes. Remove the remaining paper with warm water.
- Pour pink and gold glitter into two containers, and mix both types in equal proportions in a third.
- Cover the table with parchment or newspaper.
- Divide the bottle into three parts. Starting from the top, cover the first part tightly with PVA glue and sprinkle with golden glitter.
- The next tier should also be coated with glue and sprinkled with a mixture of pink and gold glitter.
- Grease the bottom part with glue and sprinkle with pink glitter.
- The craft needs to be secured with acrylic sealant.
Option #3: Christmas tree made of sweets and champagne

Delicious candies and champagne can be given separately, but that's not interesting. Such a delicious Christmas tree can be given to a friend or colleague: both a drink and a snack in one.
To make a candy tree from a bottle of champagne you will need:
- champagne;
- small rectangular candies (preferably in green packaging);
- glue gun (roll of tape);
- satin ribbons of red and gold colors.
Step by step instructions

- The candies are attached to the bottle starting from the bottom up, by the label tails, with pieces of tape. You need to make sure that the candies are staggered, and not exactly one above the other. The layers need to be made closer to each other so that the tree is lush. Instead of tape, you can use a glue gun.
- Having reached the top in this way, attach the ribbons. Glue spirally twisted ribbons or serpentine to the top of the bottle. Lower them to the foot of the tree.
- Decorate the top with a satin bow.
Option #4: Reverse decoupage

A bottle with a picture in the window is obtained by reverse decoupage technique. For such work the following materials are needed:
- a bottle of champagne made of clear glass;
- decoupage napkins with New Year's designs;
- white or light blue water-based paint;
- white acrylic paint;
- self-adhesive paper;
- artificial snow;
- acrylic varnish;
- brush;
- stained glass outline;
- a bottle of PVA glue.
Step by step instructions

- Remove the paper label from the bottle using warm water.
- Choose a napkin with a large New Year's picture. It is better to cut out a figure, take a Snowman or Santa Claus. Separate the layer with the picture from the napkin. You need to mark the window where the picture will be.
- Prepare the adhesive mass by mixing PVA glue and water in equal proportions. Cover the front side of the drawing with the resulting mass. Cover the bottle with glue and stick the drawing with the front side inward. Use a brush to straighten the sticker from the center to the edges, getting rid of folds and bubbles. Let dry.
- Cover the place for the window with an oval piece of paper with a sticky layer. The window will be even.
- Cover the bottle with white paint in several layers so that the bottle does not show through. Each layer should dry well.
- Once dry, the bottle can be coated with the first base color of acrylic paint, blue.
- Apply snowflakes cut out of napkins and other thematic drawings over the entire surface of the bottle, having previously coated these areas with adhesive mass. Let it dry and paint the remaining gaps with frosty patterns using contour paint.
- Now you can remove the paper from the window. And cover the bottle with acrylic varnish.
Option #5: Knitted Bottle Covers
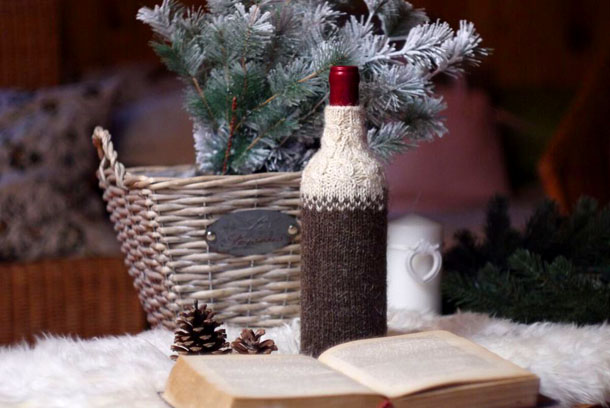
In the cold season, we always want to dress warmer. Knitted things give us comfort and are associated with coziness and warmth. So why not dress up a bottle of champagne. Any craftswoman who has learned to hold knitting needles in her hands and knit socks can make such a decoration.
To create this knitted decor for a champagne bottle you will need:
- knitting threads;
- measuring tape;
- hook or knitting needles.
Step by step instructions

- Just like when creating your own clothes, you also need to take measurements for bottle clothes.
- You can choose the threads that you have left over from knitting and are probably lying around on the shelf. It is better to decorate the edges of the bottle sweater with an elastic band. It is better to choose a hat and a scarf for the bottle in Christmas colors. You can knit the product based on the patterns that you know. It is fashionable to knit a seamless cylinder for a bottle on four knitting needles, and just a piece of fabric on two, which can then be sewn. In any case, it will look great.
- If you don't know how or don't want to spend time on knitting, you can use old sweaters that you were going to throw away. Sleeves are perfect for this idea. Untie the parts from the finished product and darn the edges so that the yarn does not unravel. If the sleeve is wide, the wool shrinks well under the influence of hot water. When wet, you can put it on a bottle and let it dry, it will shrink. Finish the bottle decor with buttons and ribbons, you can add pompoms and bells.
Your guests and friends will certainly appreciate the original champagne outfit!


Оставить Комментарий