Children are most looking forward to the New Year, because they believe in miracles and magic more, and are not yet burdened with adult problems. Winter holidays bring a magical New Year mood, because they give children the opportunity to take a break from school worries and have fun in the fresh air. New Year's chores for decorating rooms come not only to the house, but also to school rooms.
Joint creativity with children will bring many pleasant moments. Such activity develops creativity and imagination in people.
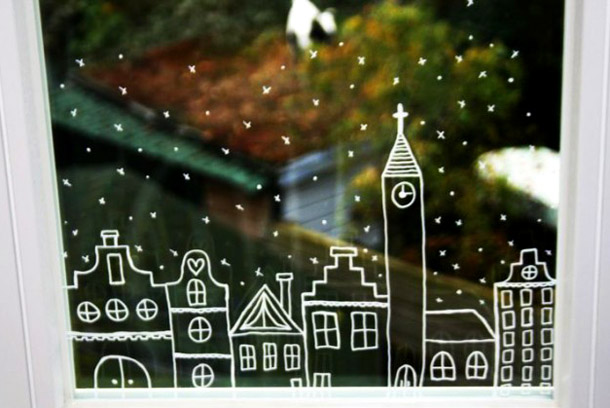
Option #1: Drawings on a school window
The most basic option is painting on windows. Thematic drawings on windows will delight children who are not in class and adults who are rushing past the school walls. The images should be made with paints that can be easily removed after the end of the New Year holidays.
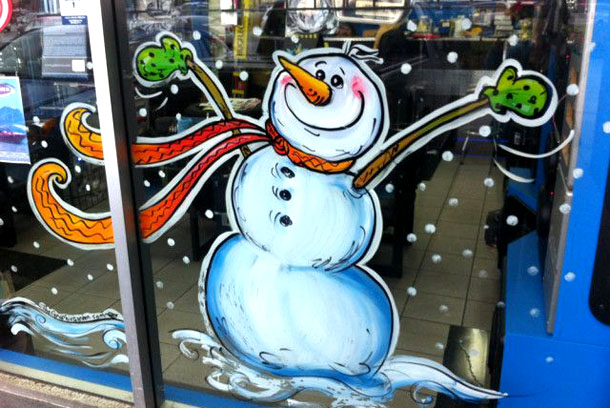
The best paints for painting on windows are gouache and toothpaste. For drawings you need to find: a foam sponge, several containers with water, rags, scissors, pencils, paper.
Procedure

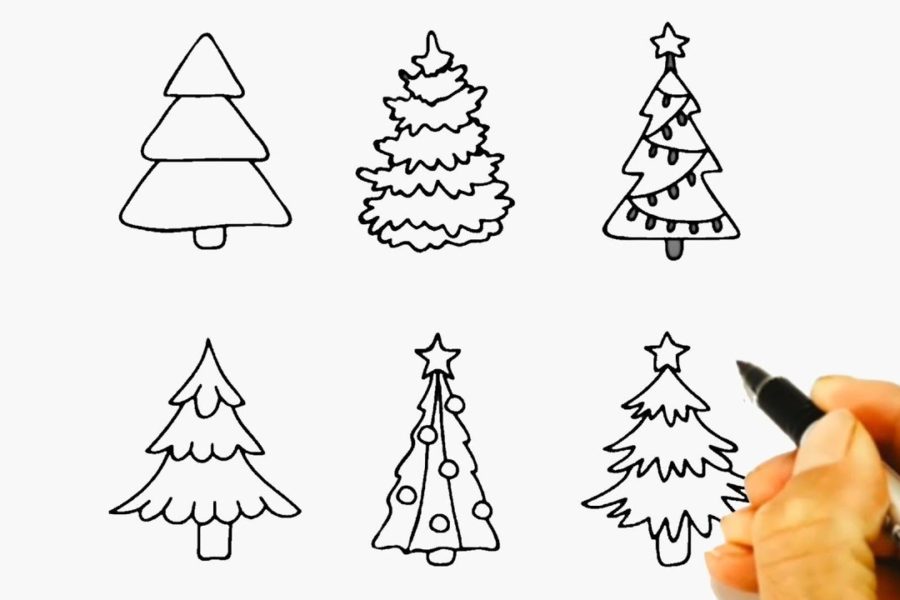
1. Find and download New Year's stencils or templates from the Internet. The most popular drawings: snowmen, snowflakes, the symbol of the year, Christmas trees, fairy-tale characters, plots from New Year's fairy tales. The stencil is cut out so that there are empty spaces, which are then painted over.
2. After deciding what the plot of the drawing will be, take the stencils, apply them to the window and wet them with water, moistening them with a sponge.
3. Dry the wet templates a little with a dry cloth so that the pattern does not flow.
4. In a container with water, dilute the toothpaste until it reaches the consistency of sour cream.
5. The drawing is applied in the following way: a small amount of the resulting mass is taken on a sponge and applied along the stencil, painting over the cut areas. Let it dry a little and remove the stencil.

If you replace the paste with colored gouache and use a brush instead of a sponge, you can get a real colored masterpiece. Such art can be easily washed off with warm water after the New Year holidays.
Option #2: Wall Christmas tree for the classroom

The guest of every New Year is a Christmas tree. But over time, we increasingly refuse to put a real Christmas tree in the classroom in order to protect nature. To create the appropriate mood for the New Year, it is not necessary to spoil the forest, and even artificial beauties are no longer so relevant. An original Christmas tree on the wall will be both a guest and a decoration of the class. Of course, you can’t dance around it, but at school they will probably put one big one in the center of the hall for this. And the class will have its own fantasy stylized Christmas tree on the wall.
Materials for making a wall Christmas tree:
- bright paper (wrapping, wallpaper or colored);
- scissors;
- scotch;
- paper confetti;
- sewing threads.
Procedure
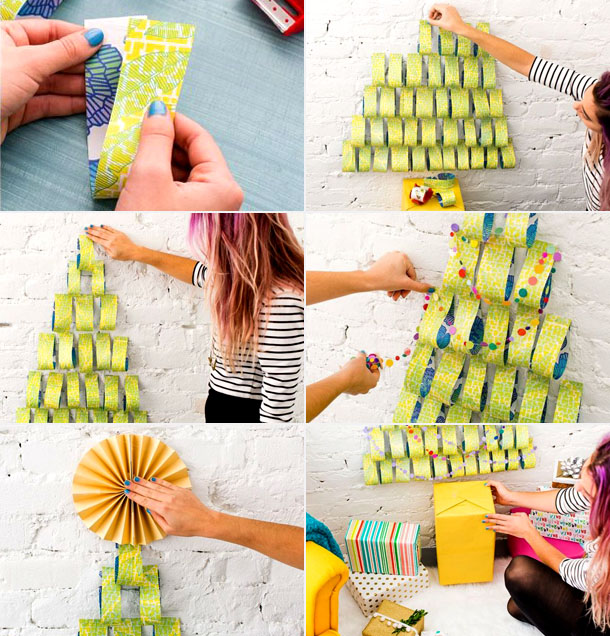
1. Choose a place for the Christmas tree and outline the contours of the triangle with a pencil.
2. Cut the paper into strips of equal width and length, fasten them in the shape of a drop, leaving a free edge at the top.
3. Attach the resulting parts to the wall in rows with tape, filling the drawn triangle.
4. Make an accordion out of two rectangular sheets of colored paper and straighten them out. Connect the edges of the two fans to form a circle. Attach to the top of the tree with tape.
5. Cut circles of different sizes from colored cardboard, sew them with thread in the form of a garland. Decorate the Christmas tree with it.
6. You can place colorful boxes with gifts, such as candy, under the tree.
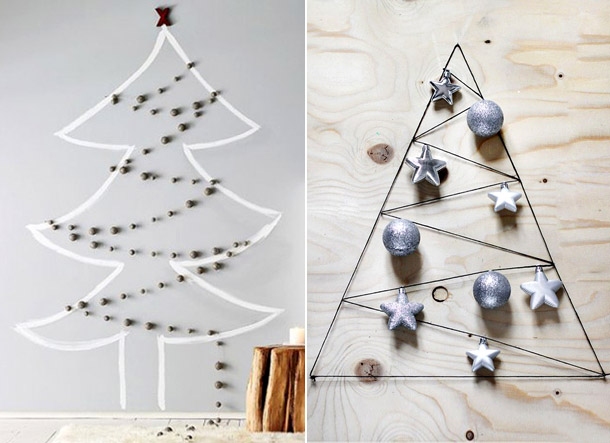
Such a thematic creation can be made not only from paper. You can print out a ready-made photo of a forest beauty, attach it to the wall and decorate it with a garland. Another option is to draw a Christmas tree on the board with chalk, put gifts under it and decorate it to your taste. And a few more ideas:


Option #3: Snowman on the teacher's desk
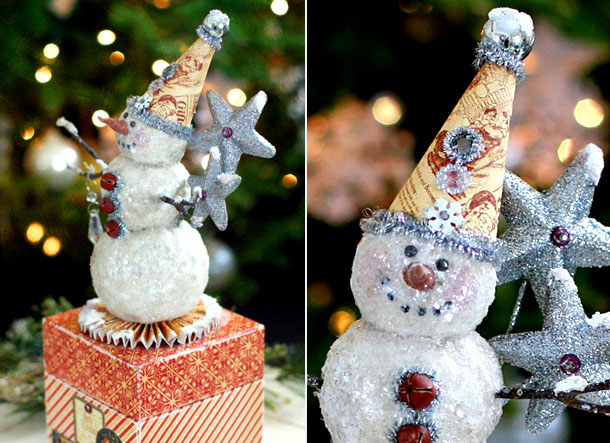
Winter is the best time for snowmen, but in the classroom they will turn into a puddle. But you can make a small snowman that will delight the teacher and children all winter long if you mold it from foam. Materials for a snowman in the classroom:
- dense foam;
- a sharp stationery knife;
- wrapping paper;
- acrylic paints;
- glitter;
- rain;
- small bells;
- glue;
- scissors;
- decorative stars and snowflakes made of plastic;
- wire;
- artificial snow;
- small black beads;
- small box;
- rhinestones.
Procedure
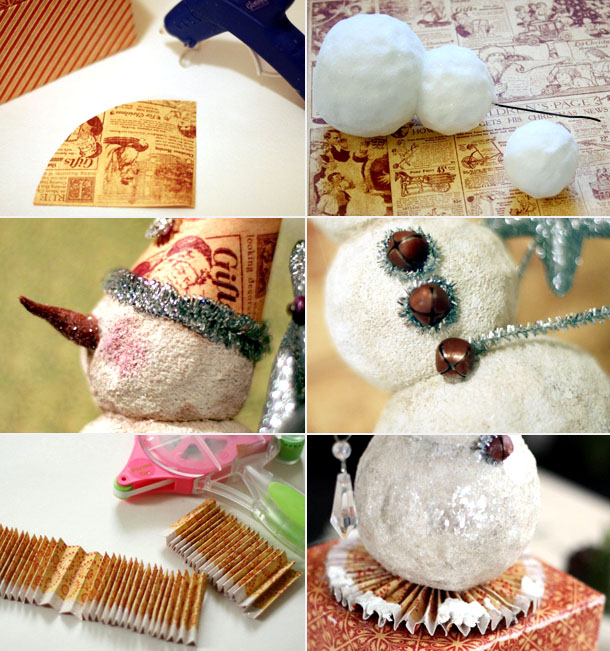
1. Cut three squares out of the foam with a stationery knife and shape them into a ball. They should be the same size as the snowman's circles - from smaller to larger.
2. Cut a small triangle out of foam and give it the shape of a carrot.
3. Attach the balls one on top of the other using wire. Sprinkle the snowman with artificial snow.
4. Also attach a nose to the snowman and paint it orange.
5. Make eyes from black beads, lips from coals. Make holes with a toothpick and attach the parts.
6. The snowman's hat should be made from wrapping paper. Cut out a triangular shape of colorful festive paper and roll it into a cone, secure the edges. You can decorate the hat with rhinestones, snowflakes, tinsel.
7. Attach the hat to the snowman’s head.
8. Now you need to give the snowman a white and blue hue using acrylic paints, and also add a blush to the character using pink paint.
9. Glue the snowman's buttons in the form of large beads.
10. Cut out several strips of wrapping paper, fold them into a small accordion and glue them together to make a corrugated stand. This will be the base on which the snowman will stand.
11. The hands need to be made from wire, and a staff decorated with snowflakes and stars should also be attached to them.
12. Wrap the box in wrapping paper and attach the snowman to it. The snow hero is ready, but keep in mind that you can't use a glue gun, as hot glue burns through the foam and nothing can be attached. It's better to use PVA glue.
Have a great holiday!


Оставить Комментарий