
New Year is the best time for a full rest, cozy home gatherings, pleasant meetings with friends. You can make the long-awaited holiday truly memorable thanks to unusual gifts and original decor.
A topiary, symbolizing material wealth and luck in various areas, will be a good idea. It can be used for a gift, decoration of your own apartment, country house, office space.
Below is a detailed description of what topiary is, why it has become so popular, where it is recommended to place such a product, and how to make it yourself from the most accessible materials.
What is topiary?
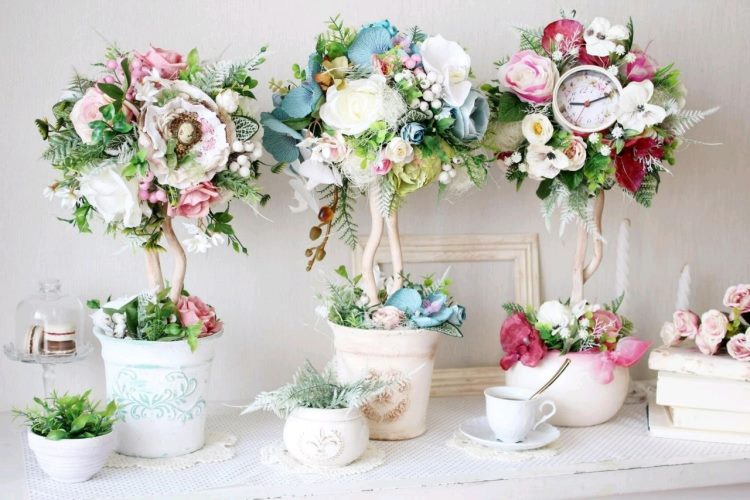
Topiary is one of the most popular types of creativity. Its second name is "tree of happiness". Such a design does not act as a complete copy of any plants existing in nature. In many cases, it looks like a unique, fantasy accessory that exists in a single copy.
The art of topiary cutting, known since the time of the Roman Empire, was originally related exclusively to landscape design. In the past, topiaries (Latin: "topiarius") meant masters who gave plants an attractive shape (spherical, triangular, square, fantasy, etc.).
Gradually, this type of creativity penetrated into interior design. Modern topiary is a compact product that looks like a beautiful tree with an original top.
Its purpose:
- decoration of interior or exterior space;
- adding originality and style;
- maintaining a festive atmosphere.
Such crafts are in demand as gifts in different countries of the world. They are ideal for those who do not keep live plants in their home.
The practical product does not require watering or complex maintenance. It is enough to place it in places not exposed to direct sunlight, where the materials used will not fade. To maintain it in a clean condition, you need to periodically blow off dust with a hair dryer (a stream of cold air).
What does the "tree of happiness" consist of?
When decorating the craft, natural materials are mainly used. Mandatory components:
- Pot-shaped base. It should be compact, beautiful, and have a stable flat bottom. It can look like a thick cardboard box, a tea or coffee container, a flowerpot, etc. It is important that the dimensions of the base do not exceed the dimensions of the entire structure. Painting, fabric, tinsel, glitter, etc. are suitable for decorating this component.
- Sturdy barrel. When decorating it, pencils, knitting needles, sushi sticks, jute, and cords are used. A cylinder that previously had baking foil or cling film on it will also do. It is believed that topiary compositions with an intricate trunk look the most impressive. In order to create a unique design, you can use tree branches or small river snags.
- Decorative crown. It can have any shape, but most often it is round. To create a crown, you need to have an elastic blank. It is most convenient to work with foam balls, a floral sponge, or hardened mounting foam. You can build a base from pieces of foam plastic connected with glue.
To decorate New Year's topiaries made with your own hands for 2025, all sorts of solutions will do:
- artificial or dried flowers,
- cones,
- acorns,
- coffee beans,
- beads,
- pebbles,
- ribbons,
- pieces of fabric,
- buttons,
- stylized insects, etc.
In the process of creating the composition, it is necessary to fasten all the elements well. Most often, the well-known PVA is used for this purpose. You can also use a heat gun with melting rods. Silicate and toxic compounds are unacceptable, since the accessory will be close to people and pets.
When creating massive structures with a top made of heavy components, substances such as gypsum, cement, and alabaster are added to the base pot. In addition, pebbles and coins can be used. This will make the man-made composition as stable as possible.
Topiary for handicrafts – decorate the interior for the New Year

An accessory made for use during the winter holidays will be a worthy alternative to a classic Christmas tree. It will perfectly fit into the setting, made in any of the existing directions.
The craft can be placed anywhere in the home. - living room, bedroom, hallway, bathroom, kitchen. Smaller versions are placed on tables, bookshelves.
Being universal, the festive decoration can be placed in the yard of a country house, on a garden plot. Quite often it can be seen in some public places, offices, other non-residential premises.
How to make a topiary for the New Year 2025 – master class
When making a fashion accessory, it should be taken into account that the crown is the most difficult to make. To design it, you will need to use maximum imagination and spend more time than to prepare other elements.
Below are step-by-step instructions with photos that will allow even a complete beginner to make a New Year's topiary with his own hands. Such methods are the most accessible for implementing a New Year's idea at home.
From Christmas tree decorations

To create a craft that can replace a Christmas tree in a small apartment, use balls (the same or different). You also need to have a base for the trunk, beautiful fabric, tinsel, gold-painted cones, ribbons, bells on hand.
Stages of work:
- the container for the future tree is wrapped in fabric and tinsel (you can simply decorate it with New Year's patterns);
- the axle is painted brown and decorated with tinsel and ribbons;
- Christmas tree balls, pine cones, and bells are attached to the “crown”;
- fix the tree in the pot.
Regular toothpicks will help securely fasten the toys. If you treat their ends with glue, they will stick firmly to the base, and the balls will not dangle.
From natural cones

The product looks like an original Christmas tree. For it, you will need to prepare a cone-shaped base from polyurethane foam.
For a mini Christmas tree you will need:
- cones of different sizes;
- small Christmas tree balls;
- red beads;
- fancy fabric;
- acrylic paints;
- glue gun.
You can also use coins of different sizes.
If the tree is to be placed in a pot, it is covered with fabric in advance (before pouring the alabaster). The cone is painted green or in the same color as the cones. The smallest cones are attached to its upper part. The larger ones are placed at the bottom.
To fill the space between the cones, use small decorations, beads, and coins. Finally, decorate the tree with red beads and design the base as desired.
Snowman

Snowman is a classic winter option. However, such a composition will not be quite typical, as it will have a crown in the form of a fairy-tale character.
To make such an accessory, you need:
- prepare a base, which will consist of two balls (the top one, protruding like the snowman’s head, should be smaller than the bottom one);
- paint it white (or cover it with snow-white material);
- provide the snowman with a smiling “face” (the eyes and nose can be made from pins with multi-colored balls; the smile is easy to draw or make from stitches of thread);
- Stick a few buttons on your stomach, take care of a small hat and a bright scarf.
Then follow the already familiar scenario. Tinsel and artificial snow can be used as decorations. The latter is made in several ways. The most accessible is using regular starch.
You need to combine 1 glass of this substance and the same amount of baking soda in a container, and then mix thoroughly. Gradually add water to the resulting substance, forming a rounded figure. After this, all that remains is to remove the lumps.
Fruit tree
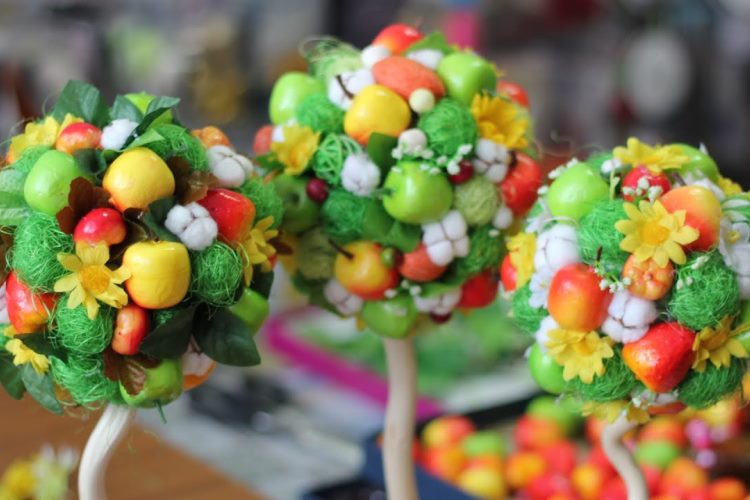
We will tell you how to make a New Year's topiary with your own hands easily and step by step, using fruits. To do this, prepare:
- pot base;
- set of artificial fruits;
- floral foam;
- several newspapers;
- mounting foam;
- skewers and a wooden stick;
- threads;
- scotch;
- awl.
The crumpled newspapers are wrapped in foil. The resulting ball is tightly covered with tape. The wooden stick, which will serve as the trunk, is wrapped with threads, moving from top to bottom.
The floral sponge is placed on the bottom of the pot and a wooden stick is stuck into it. The container with the trunk is filled with mounting foam. Armed with an awl, several holes are made in the ball. Skewers are stuck into them, on which artificial fruits are planted.
The finished tree is decorated with leaves, ribbons, and other decor. To make it brighter, you can add a few flowers and berries.
Lollipop Topiary

The sweet product will definitely interest the kids, who will gladly take part in its creation. This winter topiary, made with your own hands, is perfect for a kindergarten.
For the design you will need:
- a large bag of lollipops;
- pot;
- foam ball;
- fancy fabric;
- double sided tape.
It is very easy to make an accessory from lollipops (you can also use caramel or chocolate candies). You need to glue a foam ball with double-sided tape, and then attach the sweets to it along with the wrappers.
Next, you need to connect it to the trunk and fix it in a fancy container. The latter can be filled with foam plastic instead of plaster. Candies are poured into the container (so that the filler is not visible). The sides are decorated with fancy material.
From coffee beans

The composition will be a wonderful gift for a person who loves coffee. It looks original and unconventional.
For this you need:
- 250-300 g coffee beans;
- base for the trunk (3 cinnamon sticks tied together will do);
- A4 cardboard sheets;
- decoration in the form of tinsel, ribbons, beads;
- cotton wool or newspapers;
- sackcloth;
- container for mixing gypsum;
- small flower pot;
- stapler;
- twine;
- PVA or heat gun.
The pot is filled with liquid plaster. The base of the composition is placed in it and fixed in a suitable position. The container and the bottom of the trunk are decorated with burlap (wrapped, tied with twine).
Having cut a circle out of cardboard for the top of the crown, form a cone out of it, then glue or staple it. Make another circle, larger, which is cut along the edges. Make a hole in the center for the trunk part.
The prepared crown is filled with cotton wool or crumpled newspapers and fixed to the trunk., connect to the bottom of the pot. To speed up the process, you can use a ready-made foam cone.
The crown and trunk are generously coated with adhesive mass (processed with a heat gun) and wrapped with twine. At the next stage, coffee beans are attached in a checkerboard pattern (with the flat side facing the base). These elements are placed close to each other. The second layer is glued on top of the first (with the convex side facing inward).
It remains to fix the decorative fragments. After that, the tree should dry well.
In the form of a wreath

The peculiarity of this variant is its non-standard crown.. Now it is not provided with round or conical outlines, but is given the shape of a wreath. The following stages coincide with those already described earlier.
Having provided the workpiece with a rounded appearance, threads are wound on it and preferred decorations are glued on. Having attached the wreath to the trunk, the entire tree is placed in a container and securely fastened.
The wreath accessory will be the most relevant for Christmas. With the arrival of this holiday, it can be used both as a decoration and as a gift.
From tangerines
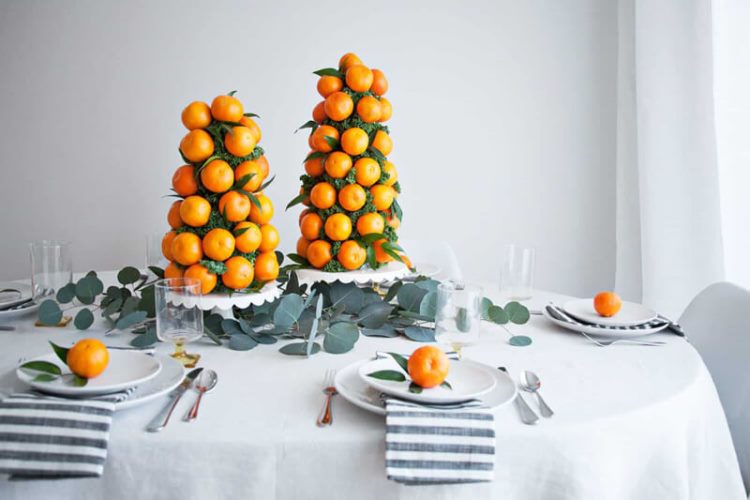
To create a New Year's topiary, you can use real or artificial fruits (the second option is more practical, as it will last longer).
To create a lucky tree, you need to place:
- a dry branch with an interesting shape;
- 0.5-1 kg small tangerines;
- a small pot;
- several spruce branches (length – 10-20 cm);
- thin wire;
- floral foam;
- with office glue;
- woolen threads;
- acrylic paint in metallic shades;
- glitter.
The wire is cut into pieces that will encircle each tangerine with a reserve for a tail 3-5 cm long. The fruits are wrapped in two pieces crosswise. The "tails" are fastened together. Then the fruits are wrapped with woolen threads, masking the areas with wire.
The pot is painted with acrylic. The floral foam is divided in half. One half, which is given a conical or rounded shape, will form the crown. The other is placed in the pot.
Prepared tangerines are stuck into the base. The resulting gaps are filled with spruce branches. The trunk, on which the crown is strung, is placed in a pot. Longer branches are used to decorate the unfilled space around the tree (individual branches are covered with glue).
To imitate snow, sticky spots are sprinkled with sugar. Glitter is applied to the pot, some of the fruits and the stem.


Оставить Комментарий