The last month of winter always brings troubles and unprecedented activity among parents. Moms and dads have to rack their brains not only in search of gifts, buying food, getting a Christmas tree and decorations for it, but also pay attention to their child. Starting from kindergarten or development studio, a child is already a full-fledged member of society, and he will also have matinees, for which you need to dress him in a costume, bring thematic crafts, learn a song or a poem. But they are still small to solve so many adult problems, and therefore on December evenings every apartment with a small person turns into a creative workshop. Parents who are engaged in hand-made only enjoy such concerns, but what should those young couples do who last made crafts back in school? Several master classes for New Year's crafts will help them with this! Such unusual toys are easy and simple to make, and even kids can help you with this activity!
Option #1: Snowy Forest
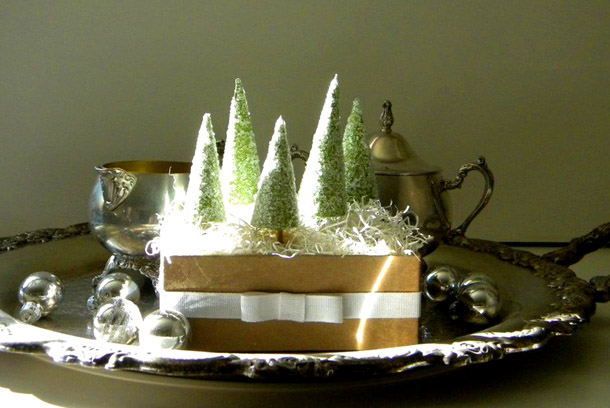
The simplest craft that will bring joy to both you and your child in its creation. After all, in the end you will get a whole forest of unusual fir trees.
To “grow” snow-covered Christmas trees, you will need the following materials and tools:
- green textured paper;
- sticks;
- shoe box;
- glue;
- glue gun;
- ribbon;
- coarse salt or scattering of transparent plastic chips;
- a piece of white soap.

The process of creating a snow forest:
- Cut squares from green thick paper, then wrap them into a cone shape. Cut squares from green paper, make cones out of them and glue the side parts of the blank.
- The tree trunk is made from a wooden stick, which must be secured inside the cone.
- Cover the cones with a layer of glue and sprinkle with coarse salt or foam chips. The layer of "snow" should be dense.
- You need to grate soap or put cotton wool on the bottom of the box. Use a glue gun to attach the Christmas trees to the bottom of the box.
- Decorate the box with a ribbon and a bow. You can add some New Year's decor.
Option #2: Volumetric snowflakes
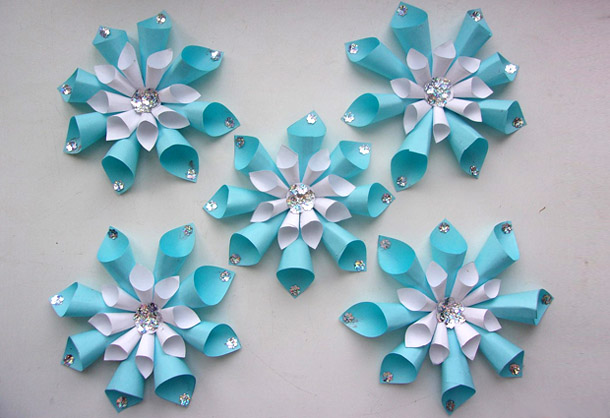
Traditional decorative ornaments can be made from anything you have at hand: felt, cotton wool, napkins, but the simplest option, which even a child can handle, is paper.
To make volumetric snowflakes you will need the following materials:
- scissors;
- blue and white paper;
- glue;
- sequins or rhinestones;
- cardboard.
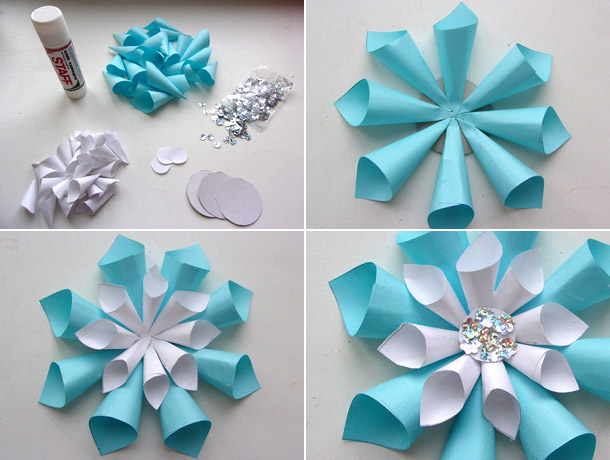
The process of making the craft:
- Cut at least 8 squares from white and blue paper. The blue squares should be 2-3 centimeters larger than the white ones.
- Twist each square into a cone shape and secure the joint with glue.
- Cut out cardboard circles according to the diameter of the future snowflake.
- Glue the blue paper cones with their tails in the center of the circle. Glue the white cones on top between the blue parts.
- For the center, you need to cut out a white circle and decorate it with shiny sequins or glitter. You can decorate it with a piece of New Year's tinsel.
- The rays of the snowflake can also be decorated with something shiny.
Option #3: Funny Teddy Bear

Ordinary Christmas tree balls can be turned into an unusual exclusive toy that a child will happily take to kindergarten, and will also be happy to hang a hand-made craft on his Christmas tree at home.
For such a craft you need to get the following materials:
- small plastic balls;
- decorative ribbons;
- glue or glue gun;
- black beads;
- white cotton pom-poms of large and small diameter (you can buy them at a craft store or make them yourself).
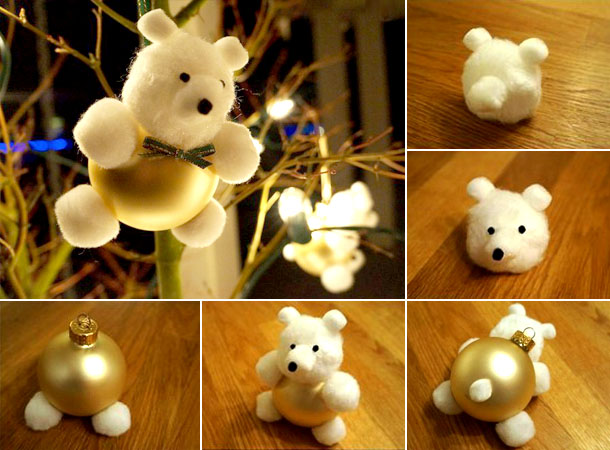
- The largest cotton pompom will be the bear's head. Two small pompoms for the ears need to be attached to it. Another one in the center instead of the nose. The bear's muzzle is ready. The eyes and nose can be outlined with a black marker or beads.
- Attach two small pompoms to the bottom of the Christmas ball, which will become the bear's lamps. Two pompoms on the sides of the ball will be the front paws.
- Attach the bear's head to the ball on top of the ball or near it. There should be a loop left for hanging. on the tree.
- You can decorate the bear to your taste, color and imagination. For example, add a scarf and a hat, or a ribbon with a bow.