The time of New Year holidays brings a magical atmosphere into our lives, anticipation of a fairy tale, high spirits, pleasant chores. All problems fade into the background, making room for more pleasant concerns. Everything stops for a while, you want to take a break and not think about anything bad.
The eyes are pleased by the many decorations that appear on shop windows and windows from the first days of December, garlands with multi-colored lights give the pre-New Year's Eve a special feeling. Everything is decorated with thematic figures everywhere, and more and more often you can meet Father Frost and Snow Maiden hurrying to the children's party. In such an environment, when a fairy tale is around, it is impossible to be sad, a bad mood disappears, giving way to a holiday in the soul.
Even the most ordinary things can be used to make an original postcard!
The feeling of celebration that overwhelms us demands that it be shared. Of course, each of us on the eve of the holiday is looking for ideas for gifts and surprises to please our relatives, friends and just acquaintances to whom we want to give a piece of our attention. But not all people dear to us are always near us. Many of us have distant relatives who live in another country. In the time of high technologies, we are used to sending simple messages on social networks and instant messengers, but remember those not so distant years when there was a queue at the post office to send New Year's cards to our relatives. Everything that was in the past is back in fashion. And imagine what a surprise it will be for those who receive not another digital message in an e-mail, but a real card that you made with your own hands!

A bright and beautiful card can be created from ordinary ice cream sticks and beads
A handmade postcard will be sent across the country or even to the other end of the planet, bringing a piece of joy and your festive mood to your loved ones. This is also one of the options not to deprive your colleagues of attention. Involve the children in the process, and your grandparents will be happy with such a greeting.
There is nothing easier than creating a chic postcard from the simplest materials, without much effort. Here you will only need your imagination, well, we offer several master classes to get started.
#1: Patterned Card

The quilling technique will make your card more delicate due to its three-dimensional design.
Quilling has recently gained unprecedented popularity among both adults and children. Due to its simplicity, anyone can create a frosty openwork pattern on postcards. Volumetric elements will add elegance to the postcard and positively distinguish it from ordinary printed postcards. There are many pattern options that can be made; having mastered the principle of creation, you can easily repeat and come up with your own designs for such congratulations.
Materials for work: multi-colored paper for scrapbooking (sheet 30 by 30 centimeters); a set of paper for quilling with stripes 5 mm wide in white, bluish-gray and gray; corrugated cardboard; an awl for twisting paper into curls; paper glue; tweezers; rhinestones, beads and other decorative elements; sharp scissors; small plastic snowflakes; scissors with curly blades; a simple pencil; a piece of thick cardboard; a knife for cutting paper.
Making a New Year's card with patterns step by step:

- 1. Take a sheet of scrapbooking paper. Cut out a piece measuring 30 by 15 centimeters. Process the edges with curly scissors or regular ones to create a relief edge.
- 2. Fold the rectangular sheet in half crosswise, keeping the middle. Press the fold. Fold the front side of the postcard in half, diagonally, starting from the upper right corner.
- 3. Take six corrugated strips of white color. Wind them one by one on a felt-tip pen or a round pen. Unravel a little, and fasten the ends with glue. Let dry.
- 4. Press the circles together on each side, flattening the corners. Fold the resulting “eyes” together, forming them into a flower shape.
- 5. Make another flower, but smaller in size.
- 6. Take strips of gray paper, wind about 2-3 centimeters onto an awl, leave the same piece even and wind a piece of paper onto the awl again. Place the resulting figure inside each flower petal made of white paper.
- 7. Glue the petals together and attach them to the corner of the card. Glue the snowflake to the top of the flower. Wind the remaining strips onto an awl, making a tight curl at the end of the strip. Place the curls around the flower.
- 8. Attach the small flower to the corner opposite to where the large flower was placed. Prepare a few more frosty curls by winding paper strips onto an awl, and design the second flower.
- 9. Decorate the card additionally with beads, snowflakes and beads.
#2: New Year's card "Poinsettia"
A card with bright poinsettia flowers will give you a Christmas mood
Poinsettia – is an American traditional flower that usually blooms in December and symbolizes Christmas. Bright red flowers will brighten up gray days and give a mood this winter. A felt poinsettia card will be very festive. It will perfectly complement any gift for New Year or Christmas.

To make a postcard with your own hands you will need: scrapbooking paper of different colors and colors, sharp paper scissors, small gold or silver snowflakes; glue gun; fine-grained sandpaper; red and green felt; white acrylic paint or gouache; buttons, beads, glitter; spool threads; star anise (stars); some gold-colored foil.
Making a postcard

Let's make a card with poinsettia:
- 1. Cut two strips of scrapbooking paper of the same size. Cut white paper to the size of the future postcard. Cut unpainted cardboard of the same size. The edges can be casually torn.
- 2. Place the white card blank and cardboard on top and bottom of the two cut strips. Glue all the parts together. Trim the edges. Process the outline on a sewing machine with a large zigzag or any decorative stitch.
- 3. Apply a little glue to the card, stick the gold foil so that the gold layer is imprinted. To do this, run a blunt object over the surface. Remove the remaining foil.
- 4. Cut 10 small rectangles from red felt. Cut off the top and bottom corners to form petals. Five of these petals need to be glued together. And from the five remaining ones, form the base of our poinsentia. To do this, you need to fasten the corners of each rectangle to get a voluminous petal. Using glue, attach them to the previous five flat ones and the Christmas flower is ready.
- 5. Using the same pattern, make two more flowers of different sizes. Attach them to the card. And the space between them can be decorated to your taste with star anise or other dried flowers or spices.
- 6. To create a snow effect, you can apply a little acrylic white paint, let it dry and rub it a little with sandpaper. The same result can be achieved by applying paint with a sponge.
#3: Card with beads

DIY Scrap Paper and Beads Card
A postcard made of beads is the simplest version of a handmade New Year greeting; even children can handle this task. Twenty minutes of your time and a festive postcard will please grandma and grandpa. To make it, you will need: scrapbooking paper; beads of different sizes but the same color, cardboard, a hot glue gun, a simple pencil, double-sided tape, paper scissors, and a ribbon.
Making a postcard

Postcard with beads step by step production:
- 1. For the base of the postcard, cut out a rectangular piece of cardboard.
- 2. Cut out a rectangle from scrapbooking paper, but slightly smaller than the card base. Glue with double-sided stitch.
- 3. From colored paper, you need to cut out several squares and rectangles of the same tone as the postcard, and glue them in a random order to create a three-dimensional drawing.
- 4. Use a simple pencil to outline the borders of the Christmas tree on the card. Starting from the bottom tier, fill the schematic drawing with beads. From bottom to top, the beads should go in size from larger to smaller.
- 5. Make a cut on the side of the card and pull the ribbon through, tie a bow.
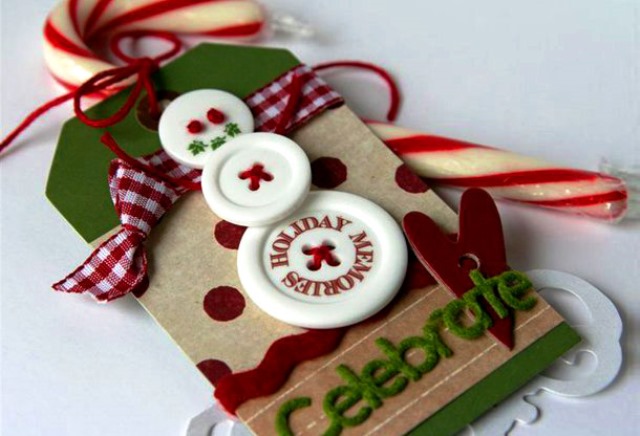
#4: Button Card

Decorating a New Year's card with buttons
It will take you ten minutes to make such an original and simple postcard. The materials and tools for its creation can be easily found at home. You will need: thick cardboard, scrapbooking paper, buttons of different sizes, scissors, white and red threads, a needle, glue, a foil star, rhinestones, congratulatory inscriptions and other decorative elements that are at hand.
Making a postcard
- 1. Fold a sheet of cardboard in half and decorate with scrapbooking paper.
- 2. Using a simple pencil, draw the outline of the Christmas tree and glue the buttons, filling in the outline.
- 3. Rhinestones will serve as decoration for the tree. They need to be glued on top of the buttons, as if hanging balls on the tree. Attach a foil star to the top. You can glue a trunk cut out of brown paper to the bottom of the tree.
- 4. Interlace the red and white threads and stitch them around the tree like a garland.
- 5. The congratulatory inscription can also be attached to our Christmas tree.
#5: Napkin Card

Handmade volumetric Christmas tree in a postcard!
You can make an original New Year's card with a 3D effect from ordinary white napkins. The usual flat card will be a surprise for everyone when opened, as there will be a fluffy Christmas tree inside. Such cards are very convenient to put open on a shelf or on a desktop. Even children can make such a card for their grandparents due to its complexity. For this you will need: A5 colored cardboard, scissors, snow-white napkins, self-adhesive stars and snowflakes, sequins, beads or seed beads, glue.
Making a postcard

Making a postcard from napkins step by step:
- 1. Bend a sheet of colored cardboard in half and press the bend. The best option would be dark cardboard for a brighter contrast of the white Christmas tree against the background. The edges can be processed with curly scissors, this will add originality and style to the handmade craft.
- 2. Unfold regular white napkins completely and cut into squares 7-8 centimeters wide. You need to make seven to nine of these blanks of different diameters, starting from ten and up to 3 centimeters. Depending on the height of the card you decide to make. 3. Form accordions from the prepared strips, pressing the folds tightly. Fold the accordions in half.
- 4. The blanks need to be folded like accordions and bent in half. Attach the bend to the fold of the postcard in the center. Attach the resulting parts from the bottom up in order of increasing diameter.
- 5. Beads, seed beads, and rhinestones will serve as decorations for the Christmas tree.
- 6. Above the tree, on the surface of the dark card, you can create a starry sky and snowfall using stars and snowflakes, respectively. This way, the picture will be more complete and fabulous.
- 7. Decorate the top of the tree with a star cut out of colored paper and some curl. Attach the decoration by bending it in half. Glue the star so that its halves are on different sides of the fold of the card. When closing or opening, the handicraft is not transformed.
- 8. You can decorate the front of the card with stars, snowflakes, glitter and other cute New Year-themed details to your taste.


Оставить Комментарий