Every year, the New Year's bustle begins the same way with summing up results and reports at work, the desire to finish all the work by the end of the year, thinking over the menu, looking for decorations for the Christmas tree, preparing for children's parties. But this bustle also includes the search for gifts for relatives, friends and colleagues. Those who have acquired a wide circle of acquaintances and it is either expensive or impossible to please everyone with gifts are especially unlucky.
And I want to remain in the memory of these people as a kind and sympathetic person, because your relationships are not filled with just work!
Option #1: 3D Christmas tree

Making a Christmas tree for a gift requires the following materials:
- scissors;
- thick colored cardboard;
- stationery knife;
- paper.

Sequence of work on making a craft with your own hands
- Templates for Christmas trees need to be downloaded and printed on a printer. You can enlarge or reduce them as desired. Cut out paper blanks.
- Transfer the Christmas tree models onto thick cardboard. Mark the cut lines on the cut Christmas trees. Remember that three blanks should have them on top, and three should have them on the bottom.
 3. Lay out the blanks according to the diagram in the picture. Connect the cardboard Christmas tree with cuts at the top with three Christmas trees with cuts at the bottom. Attach two more blanks on the sides. You have a three-dimensional figure. If you have time, desire and imagination, you can create a whole composition from such figures. Decorate with New Year's decor.
Idea #2: Fireplace from boxes

For fireplace decoration of the apartment you will need the following materials:
- a large cardboard box (for example, from a TV);
- cardboard shoe box;
- glue;
- stationery knife;
- scissors;
- self-adhesive film imitating brickwork;
- white paint;
- foam baguette;
- candles;
- New Year's socks for gifts;
- ruler;
- pencil;
- brushes;
- tinsel.
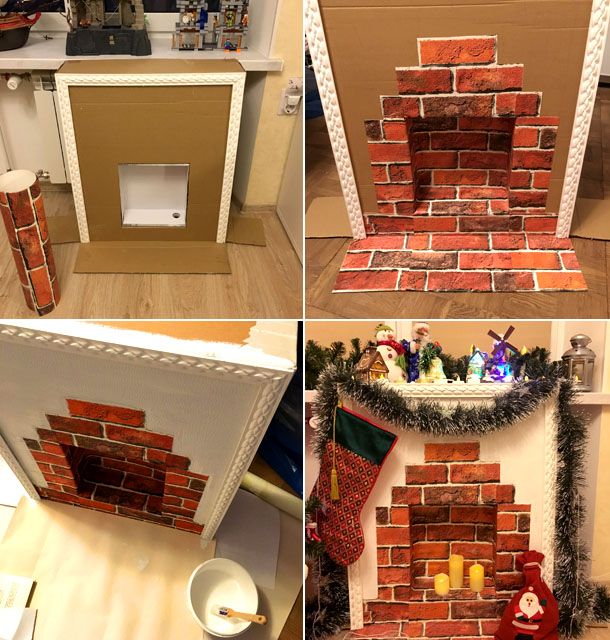
Sequence of actions when making a fireplace:
- On the large box that was left over from the TV, mark out the future fireplace. A shoe box should fit tightly into this space.
- Use a utility knife to cut a hole along the markings and insert a shoe box into it. Use a utility knife to make a hole and insert a shoe box into it. If you leave a little extra on the cutouts of the large box and bend the glued tabs inward, the assembled fireplace will hold tighter.
- Bend the lid of a large box and install it in the place of the future fireplace. Cover the perimeter of the box with the old baguette with imitation stucco.
- Decorate the inside of the fireplace and part of the wall with self-adhesive paper with a brick pattern or wallpaper with such a design. You also need to glue the cardboard, which is the support.
- Paint the remaining parts of the fireplace white. Let the structure dry.
- After drying, put a few candles or Christmas tree lights in the fireplace. Decorate the top with New Year's tinsel to your taste, color and fantasy. In the evening, light the fireplace and enjoy the coziness of the home fire. Such a gift can be made for those to whom you wish warmth in the New Year.
Idea #3: Christmas Gnomes

Items and materials for making gnomes:
- red and gray felt;
- white or milky threads for knitting;
- sewing threads;
- tailor's scissors;
- needle;
- cardboard;
- paper;
- pencil;
- beige knitwear for the nose;
- striped knitwear for socks;
- red knitwear for legs;
- glue gun;
- dye;
- brush;
- synthetic padding;
- wooden shoes (can be purchased at craft stores).

Making a gnome includes the following stages:
1. Download and print out the patterns for sewing toys. Cut out the samples and redraw them on the cardboard for the blanks.

2. Cut out the required number of pieces from red and grey felt.
3. It is better to sew the cap from red felt. The ends of the blank must be connected. You can embroider snowflakes on the cap with white threads. Cut the tassel from the cap with scissors.
4. Embroider white snowflakes on the front side of the felt. Sew the two cone-shaped blanks together and fill with padding polyester. Sew the bottom part. Leave space for the gnome's legs.
5. Cut two thin strips from red jersey and sew them lengthwise. Fill with padding polyester.
6. Sew striped pieces of knitwear to the ends of the red pants instead of socks.
7. Cover the shoes with red paint. Attach them to the legs with a glue gun. Attach the legs to the remaining gaps of the gray cone. Sew the craft.
8. Cut white knitting threads for the beard and sew them with a sewing needle and regular thread. Attach to the upper part of the toy's body.
9. For the nose, cut out a piece of beige knitwear and form a ball, filling it with padding polyester. Sew up the hole and glue the finished nose to the beard.
10. Put the cap on the gnome up to the nose. To make it stay on more firmly, you can coat the lower part with glue. The gnome is ready!
Idea #4: Soft Christmas tree pillows

To make festive Christmas tree pillows you will need:
- pieces of fabric;
- threads;
- needles;
- synthetic padding;
- paper;
- pins.

The process of making a pillow is extremely simple:
- You can download the Christmas tree template from the Internet and enlarge it to the required size, or draw it yourself on a large sheet of Whatman paper. Cut out the template for future pillows.
- Pin the paper pattern to the fabric. Leaving a spare 1 cm for the seam, cut out two elements of the fabric Christmas tree.
- Sew two blanks from the inside, leaving openings for filling with padding polyester. Sew up the filled pillow. The gift is ready!
Christmas trees can be made in different sizes using scraps of fabric left over from sewing work.
Idea #5: Sweet Sleigh

For sweet sanschats you need to stock up at the supermarket:
- curled-tail lollipops;
- some chocolates;
- candies (large);
- bows;
- artificial spruce branches;
- small Christmas tree balls;
- ribbons;
- beads;
- artificial snow.

Steps to making a sweet gift:
- The runners of the sled - bent caramels - will be the base, and the entire load will be loaded onto it. But in order for the sweet gift to hold its shape, the candies need to be placed on a ribbon, which will then be used to fasten the entire cart.
- Place a chocolate bar or a flat package of wafers on the runners - this is the bottom of the sled. Place all the other candies on it in a pyramid. Then tie the entire load with the ribbon that you placed in the previous step.
- All that's left is to decorate the sled with a spruce branch with beads, cones and a bow. Attach all the decorative details to the artificial spruce branch with a glue gun. If desired, you can sprinkle it with artificial snow or glitter. The sweet gift is ready!


