On New Year's Eve, you want little joys, and cute handicrafts in the house will please not only with their festive appearance, but also with the process of their production. Decorations in the form of cute little things will create a magical atmosphere in the house or office. For work, you will need accessible and simple materials. You can spend the evening with benefit and fun if you spend the process of making crafts with your family. But if you are alone, then dedicate this evening to yourself, plunging into childhood, making cute angels and snowflakes. Having given this New Year's crafts your warmth, your most cherished wishes will definitely come true in the New Year and the next one - you will no longer be celebrating it alone!
Option #1. Paper angels
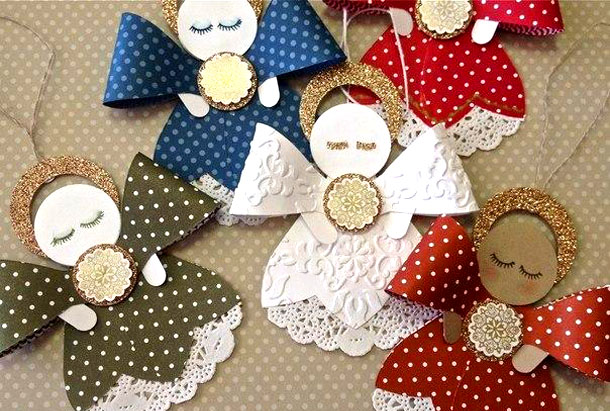
It was the angel who brought the news of the birth of the savior, so the figures symbolizing him can be called the main ones among Christmas decorations. A cute little angel can be made from paper and the following materials:
- thick paper with a pattern or relief
- plain white or brown paper
- a piece of designer glitter paper
- lace napkin for scrapbooking
- decorative button
- mock-up mat
- pencil, scissors, glue
- double sided tape
- beautiful thread for hanging
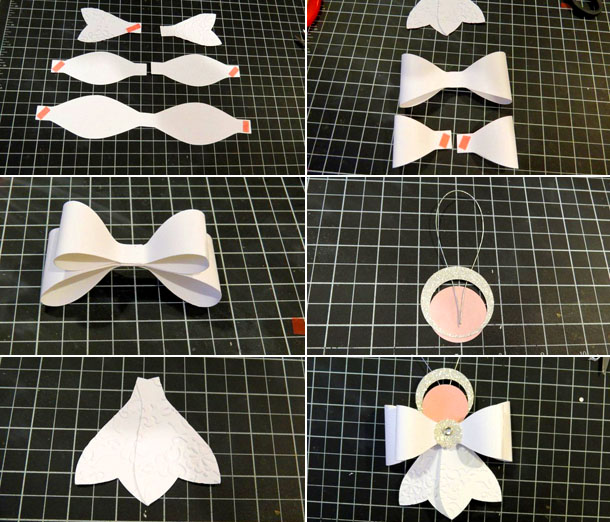
- Cut out three types of details from decorative paper. The first two are for the angel's outfit. The rest are for the wings. Glue pieces of tape to the ends of each detail. Assemble the details according to the instructions as in the photo.
- Connect the wing pieces into a large bow, bending the ends.
- Cut out the angel's head from plain paper (circle 1.5 cm in diameter), for the halo you need to take shiny paper (diameter - about 2 cm). Glue together.
- Draw eyes, lips, and cheeks for the angel. Attach a loop of thread to the back of the head. Assemble the parts into a figurine.
- Decorate the place where the wings connect to the angel's body with a cute button.
Option #2. Paper Christmas tree decorations

Geometric balls are very easy to fold yourself. All you need is paper, scissors, glue and a little patience. By the way, in addition to a new decoration for the tree, this process is a good distraction from problems and can be an excellent prevention of the blues, which often occurs at the end of the year, when a bunch of problems and things fall on your head.
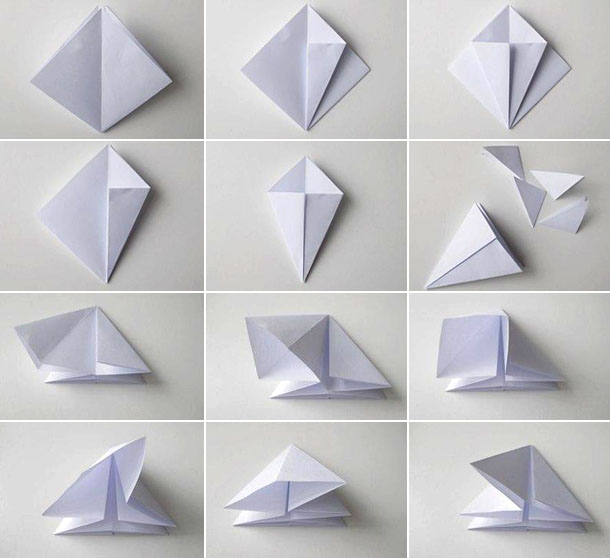
- Cut a square out of a sheet of paper. Fold according to the instructions as in the picture. The fold lines should be even and clear, you can use a ruler for this.
- Once you have a rhombus with one side protruding, you need to cut off the excess paper.

3. Continue to fold the craft according to the diagram in the second picture.
4. After all manipulations, unfold the sheet and give it the desired shape. To do this, you need to glue the edges together.
5. For fastening, attach decorative thread for the craft and decorate the tree with it.
Option #3. 3D paper snowflake
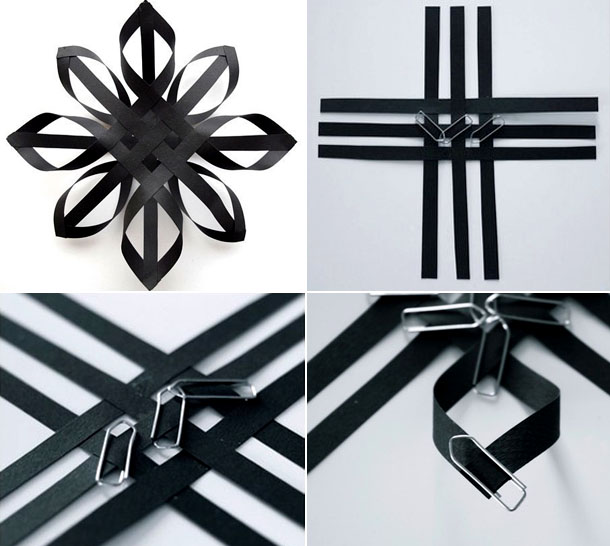
Openwork snowflakes are a new method of traditional figures of New Year's decor. Just as nature pleases with a variety of snowflakes, so master classes tirelessly offer new versions of these beauties. This time, the openwork snowflake will require the following materials:
- A4 sheet of paper
- paper clips (10 pcs.)
- glue
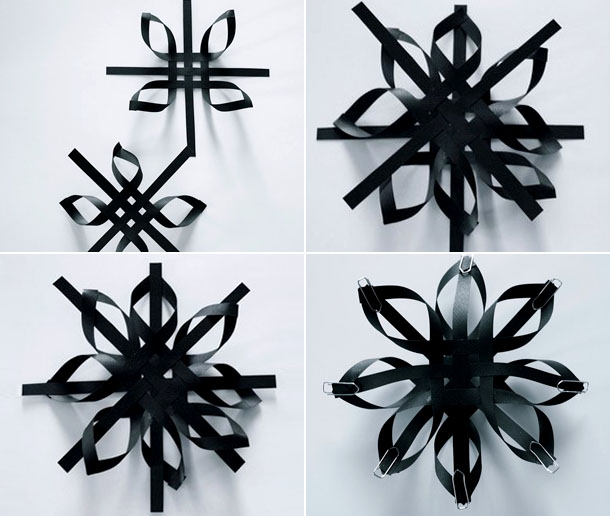
- Cut six strips of equal length and width from colored paper.
- Place three strips at right angles to the others.
- The middle one should go over the first and third horizontal ones, the other two – vice versa. It is better to fix the intersections of the ribbons with paper clips.
- The snowflake should have 4 rays after connecting the ends of the strips.
- Make another similar blank and place it on top of the first one at a right angle.
- The result is a snowflake with 8 rays. Secure the ends with glue and the snowflake is ready!
Option #4. Paper Christmas tree pendant
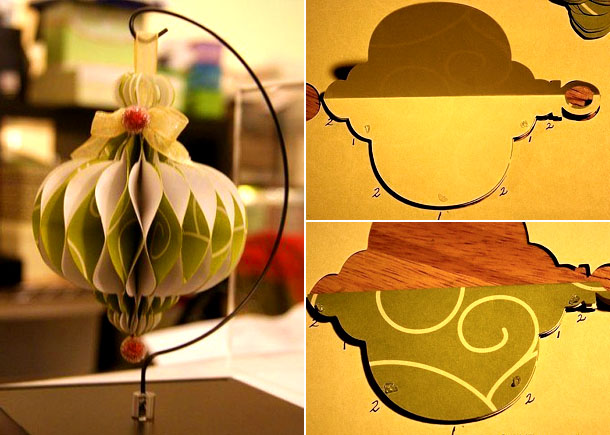
For such a pendant you need double-sided paper with a pattern. An unusual toy will add variety to the decorations of the Christmas tree.
Materials:
- thick designer paper
- stationery knife and glue
- thin beautiful ribbon
- decor (stones, buttons)

- Draw the template of the part on paper and cut out along the outline.
- Make a hole for a thread or ribbon.
- Cut out ten such details. The splendor of the toy depends on the quantity. The more, the splendorier. You can make several different in size and splendor - it will look stylish on the tree.
- Fold each piece in half and glue the fold line in three places: top, middle and bottom.
- Decorate the place where the loop is attached with a ribbon bow. Pull the remaining ribbon through the hole for attaching and hang the decorations on the tree.
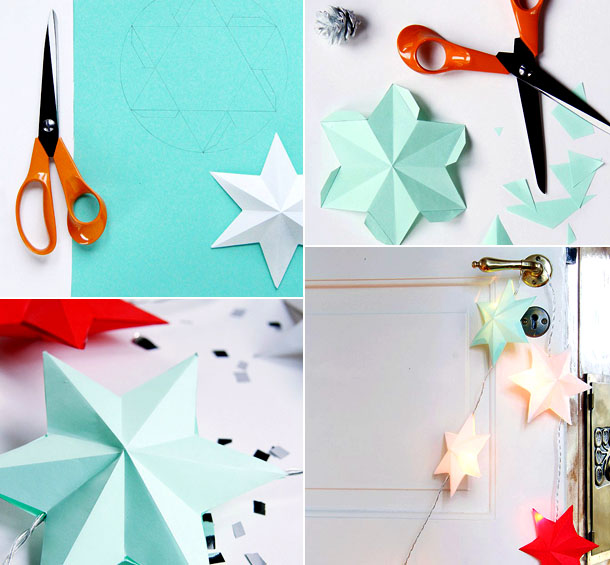
Option #5. Garland of paper stars
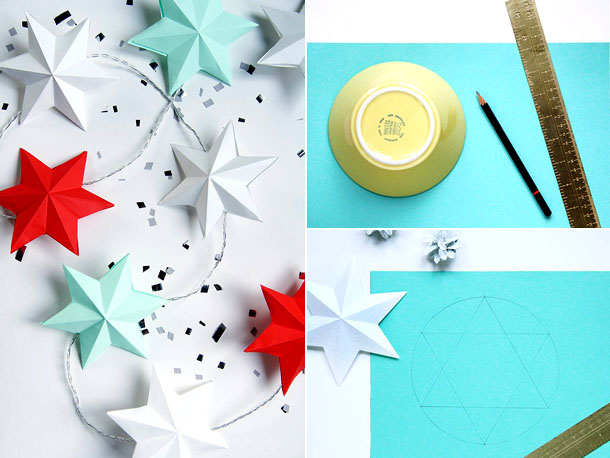
Stars are always associated with dreams and wish fulfillment. Such a garland can decorate a Christmas tree, and can also become a night light for the bedroom. Let your dreams be fabulous, and may your dreams come true!
Materials:
- thick paper of two or three colors
- pencil, ruler, scissors
- saucer with a diameter of about 15 cm
- glue
- electric garland
- To make a template, take a saucer, place it upside down on the paper and trace the outline.
- Inscribe two identical triangles in a circle so that they intersect. For the garland, each star has two sides. The second part should be slightly larger, you need to leave space for the edge of the fastening.
- Cut out stars and fold them in different directions to add volume.
- Apply glue to the seam allowances and join the halves of the star together.
- You need to leave two holes opposite each other.
- After you have made the required number of stars, thread the garland through the holes in the figures.
- The included star garland is ready!
Option #6. Paper cones
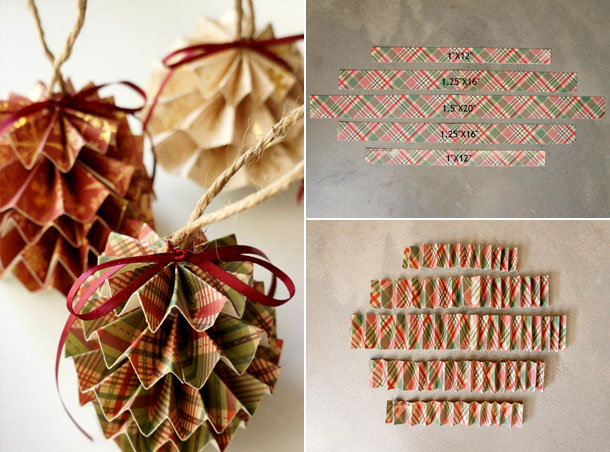
Such colorful toys will decorate the green beauty and will please the children. For work, choose paper with a pattern to your taste. Frosty patterns and a modest checkered pattern will do. Materials:
- thick paper with a pattern
- ruler, scissors, glue
- twine
- thin satin ribbon
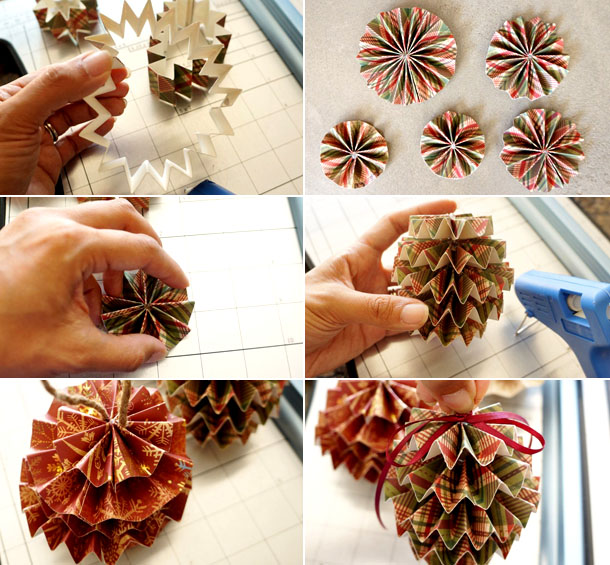
- Cut the paper into strips: two – 1 cm wide and 10 cm long, two – 1.25 cm by 16 cm, one – 1.5 cm by 20 cm. Fold each strip like an accordion and glue the edges.
- Connect the bend lines, assemble the toy according to the diagram in the picture.
- All that remains is to glue them together in order: small, medium, large, medium, small.
- Decorate the top of the toy with a ribbon bow to attach to the Christmas tree.
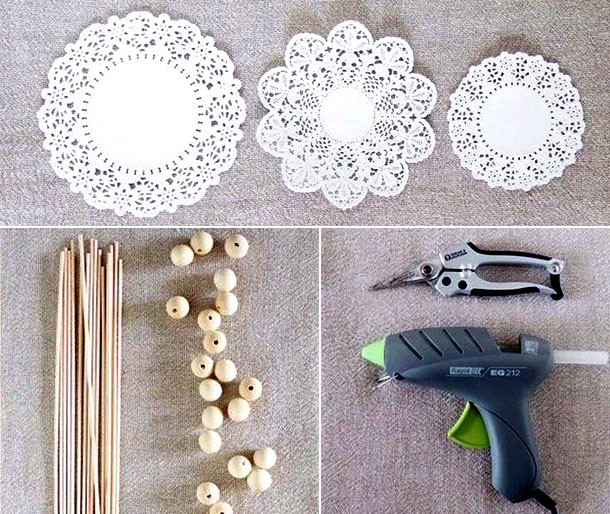
Option #7. Lace Christmas tree

A window sill or a bookshelf will be well decorated with an openwork forest. And for a desktop, one such tree will be enough, but it will give a New Year's mood.
Materials:
- lace napkins for scrapbooking
- wooden skewers and round beads
- glue
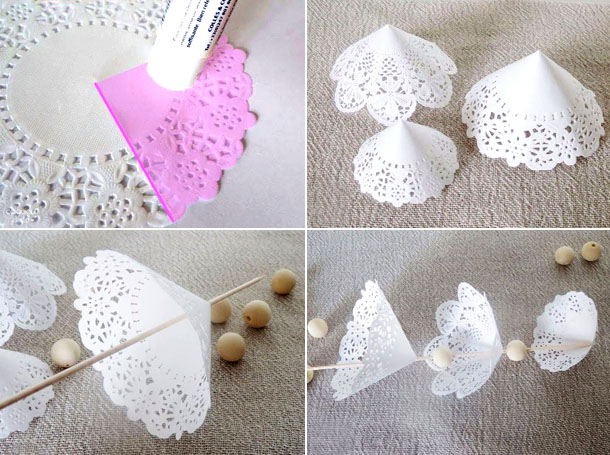
- Find three openwork napkins with different patterns and different sizes.
- Roll the napkins into a cone and glue the corners together. Thread onto a wooden skewer.
- To attach each napkin, you need a bead coated with glue.
- You can use a piece of foam plastic as a stand, which will act as a snowdrift.